

So you say you want to publish the app on Google Play Store? Always had a great idea for an app, that you wanted to make it a reality? Have a certain flair for App development? Wanted to contribute to the Android community, or just want an App to go with your Online engagement and sales? Well, Say no more.
We got you covered with simplified steps, to get your Android App published on Playstore.
With over 3 million Apps already present, and over 4000 new apps uploaded every day, Google Playstore has become an essential commodity for every Android user there is, and your app will be alive and kicking by the time you have done with the process below.
So, here we go.
Step 1. Get started with a Developer License
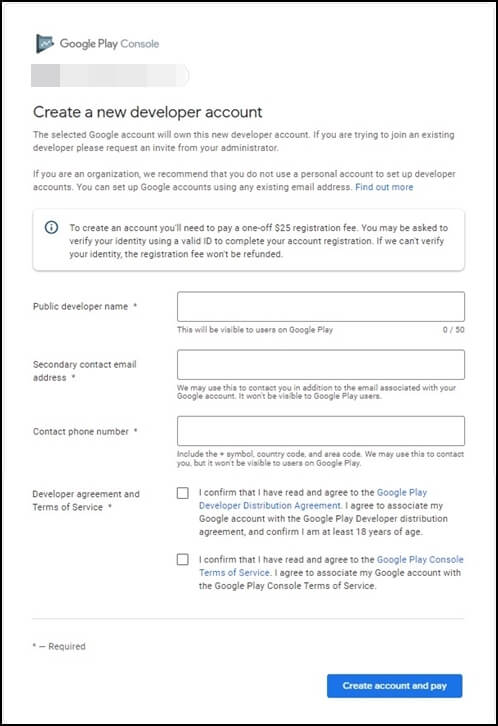
The signup process is pretty simple, and you’ll need to pay a lifetime registration fee of $25.
Payable using a credit card, or through online-banking methods..
To finish the sign-up process, fill out all your necessary account details, including your Developer Name.
Don’t worry, You can always edit to your heart’s content, even after registration.
Also, do remember that it can take up to 2 days for your registration to be fully completed.
Step 2. Monetize with Google Merchant
If you decide to sell paid apps or enable in-app purchases in your app, you have to create a Google Merchant Account. There you can analyze your app sales and your monthly payouts, as well as generate sales reports.
Once you finish creating the Merchant profile, you can automatically link with your developer account, and you can also integrate it with other marketing tools in the meantime.
Step 3. Create your own App
Finally, This is your chance to get going with the actual submission of your app,
But before we get to that, let’s run over the requirements for your new app-
- Special Bundle ID – The package name should be apt over the duration of your application in the playstore, which is set in the manifest file.
- Signed App Release With a Signing Certificate
- The App Size – 100MB for Android 2.3 and higher, 50 MB for lower Android versions.
- File Format – Two possible release formats are accepted by Google: app bundle and .apk. However, .aab is the preferred one.
Starting from August 2021, all new apps have to use the App Bundle (AAB). This format is useful only for uploading to the Google Play Store.
Now that you have set up your Play Console, you can finally add your app.
Here’s how to do that:
‘All applications’>> ‘Create Application’>>Default language>>”Create”
Don’t forget to type in a title for your application. The title of your app will show on Google Play after you’ve published it, and you can edit it out later. After you’ve created your app, you’ll be taken to the store entry page.
Step 4. Store listing on the roll
This is the stage where you fill in the app details, all the info which you need the users to know goes in here. The listings have the information is divided into many Categories –
Product Details
Fill in your title and description.
Be careful when you add in the keywords, you don’t want Google to take down your app, just because it appeared too shady with your shabby choice of keywords.
Graphic Assets
Under this category, you can add screenshots, images, videos, promotional graphics, and icons that showcase your app’s features and functionality.
Some parts under graphic assets are mandatory, like screenshots, a feature graphic, and a high-resolution icon. Below are the necessary requirements:
| Particulars | Details |
|---|---|
| Screenshots | -2 to 8 in number, JPG or PNG. The ratio shouldn’t exceed 2:1 |
| Icon | – 512 X 512 – PNG – Maximum file size: 1024KB |
| Localization | -If your app comes in several languages, you need to mention them and add additional translations of your app’s information, so as to appeal to the users coming and checking out your app. |
| Application type and categorization | -Go to Drop-down menu >> application type: game or app. -Pick a category that you think your app belongs to. -You may also add a section to rate your content after uploading your APK. |
| Contact details | -Provide the necessary forms of contacts, so that users can contact you. |
| Privacy Policy | -Google requires you to add a link to the Privacy Policy, in case the users might find a breach of their privacy. -In case you feel the need to take a break, click Save Draft, and complete it later. |
Step 5. Content Rating Questionnaire
You need to fill in the questionnaire, not to be marked as an Unrated App [ that may lead to app removal ].
Save Questionnaire >> Calculate Rating
- Finally, click on Apply Rating to confirm the rating.
Step 6. Pricing Your App
In the Pricing and distribution section, you need to mention –
Whether your app is free or paid, the countries it is available in, the devices they are compatible with, and whether it is PG or R rated.
- Please remember that you can change a paid app to free later, but that can’t happen vice versa.
Step 7. Upload your APK and have it reviewed.
Now, this is your final step, and the most exciting of all, you get to hand over your app to the Google Playstore.
First and foremost, you have to decide on what kind of release you want, Alpha or Beta.
Alpha – It is closed testing and is available only to invited testers
Beta – anyone can join your testing program.
After your selection, Go through the following steps,
Manage [ Production/Beta/Alpha ] >> Edit Release >> Upload
Now, you may click ‘Review’ to be taken to the ‘Review and rollout release” window, where you can check errors and issues with your App version.
When you are all done and settled, tap ‘Confirm rollout.’ and your app will be published to all the users you chose in your target countries on Google Play.
The app will be released right after it passes the review, which takes up to 2 days tops.
Google says the review process could take up to 7 days or even longer. Recently, due to the Pandemic, which has been extended to 2 weeks or more.
Once the app is done being reviewed, a notification on Google Console Dashboard will be seen. Congrats!
Final Take by Tecvalue
So you have gone through all the steps for publishing an App on Google Play. Well Done!
Don’t forget, This can only be done if you already have a Google developer’s license [ which might set you back by $25 ] but it is worth the investment, as it gives a lifetime membership.
The journey only starts with publishing, the real work comes from post-development, where you have to continuously refine the user experience.
If you have successfully submitted your Application on the Play Store be sure to drop a comment below, with the link of course.