

Whenever you consider switching to a new music streaming service over your existing one, you will likely have a hard time figuring out how to transfer your curated playlists onto the new platform. You go through the list of options from your app’s settings menu but could not find anything related to a transfer.
It might seem like your streaming device is incapable of exporting your saved playlists to another service. However, you would be surprised to know that almost all of the popular music streaming services do not have a dedicated transfer option.
Therefore, if you are planning on manually transferring your Apple Music playlists to Amazon Music, you should refrain from doing so as there is a much easier solution to this problem.
In this article, I will take you through all the necessary steps required in order to transfer your playlists from Apple Music to Amazon Music. I will also be listing down the method by which you can create your own playlist using the Amazon Music app.
Using a Third-Party Service for Playlist Transfer
To transfer your playlists from Apple Music to Amazon Music, you will need to make use of a third-party software. This is because most music streaming services do not allow the transfer of playlists from one platform to another.
Such a restriction has been imposed by the developers to maintain the exclusivity of their respective platforms, forcing users to create an entirely new playlist from scratch.
This is where the third-party applications come into play. These applications have been specifically designed to enable playlist transfer between two individual platforms.
Some of the most popular third-party applications that you can use for transferring your playlists from Apple Music to Amazon Music are FreeYourMusic, Soundiiz, and Tune My Music. All of these applications are free to use and also feature a premium version with some additional options.
How Do These Applications Work?
The aforementioned services will have a list of the most popular music streaming platforms for you to choose from. You will need to put in the source of your playlists as well as the platform on which it should be transferred.
These services will initiate the playlist transfer process by collecting the metadata from your existing platform. After that, it will try and sync up the metadata of all the songs in your playlist to soundtracks from the destination platform. Once the synchronization process is over, the application will automatically start transferring your playlists to the new platform.
Credibility
Another thing that I would like to mention is the credibility of these services and whether or not you should have privacy concerns.
Well, in order to activate the transfer service for these apps, you will need to give access to both your Apple and Amazon accounts. This will include sharing Account Information, and passwords as well as your permission to acquire metadata from the saved playlists.
However, there is nothing to worry about as these services rely on specific information. On an additional note, you can always revoke all permissions from the service once the transfer process has been completed.
For the purpose of this guide, I will be showing you how to carry over your Apple Music playlists to Amazon Music using the FreeYourMusic app. Nevertheless, you will be able to use any of the services listed above based on your preferences.
How to Transfer Your Playlists From Apple Music to Amazon Music Using Third-Party Services?
FreeYourMusic is an easy-to-use, reliable playlist transfer service available on Android, iOS, Windows, macOS, and Linux. The following section will include a step-by-step guide on how to transfer your playlists from Apple Music to Amazon Music using the FreeYourMusic app.
Step 1: Download the FreeYourMusic app from the respective App Store of your device. You can also download the app on your PC by navigating to the official FreeYourMusic website and clicking on the Download Windows button.
Step 2: After the download has been completed, launch the app on your device.
Step 3: Select the Source platform from the list of available options. In this case, Apple Music should be selected as your Source.
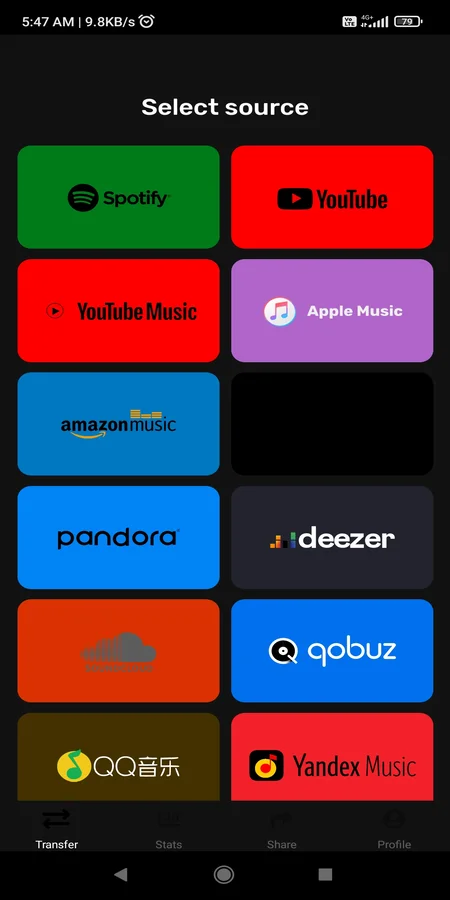
Step 4: Once you have selected the Source platform, the app will automatically take you to the Sign-In page where you will need to log into your account using your Apple ID.
Step 5: After signing in, the app will let you select the Destination platform. In this case, Amazon Music should be selected as your Destination.
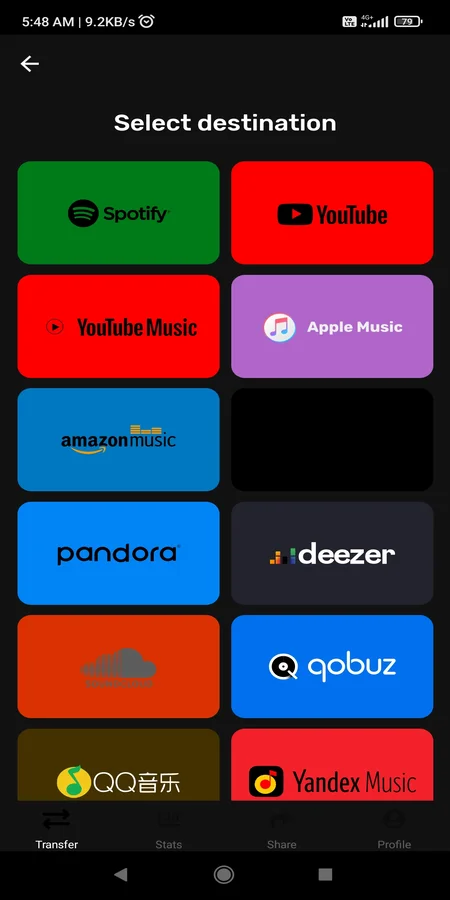
Step 6: After you have selected the Destination platform, the Sign-In page for the Amazon Account will appear. Log into the Amazon Account using your credentials.
Step 7: After signing into your Amazon account, a pop-up screen will appear with a list of all your saved playlists on Apple Music. Select the ones you wish to transfer.
Step 8: Confirm your action. The transfer process will usually take up to a few minutes depending on the length of your playlists.
Step 9: After the transfer process has been completed, go to the Amazon Music app and check if all your songs and playlists have been transferred successfully before de-registering from your former streaming service.
If there is an issue during the transfer process, the app will let you know the number of tracks/playlists it was unable to transfer. For fixing this issue, you can repeat the steps mentioned above or can manually add the tracks later on.
There you go! Within a matter of few minutes, your Apple Music playlists will be transferred to the Amazon Music app. Now, you can start listening to all your favorite songs with the added comfort of shifting to your preferred streaming service.
How to Create Your Own Playlist on Amazon Music?
If you are using the Amazon Music streaming service for the first time, creating your own playlist is quite simple. Follow these steps.
Step 1: Launch the Amazon Music app on your device.
Step 2: Navigate to the Library section and select Playlists.
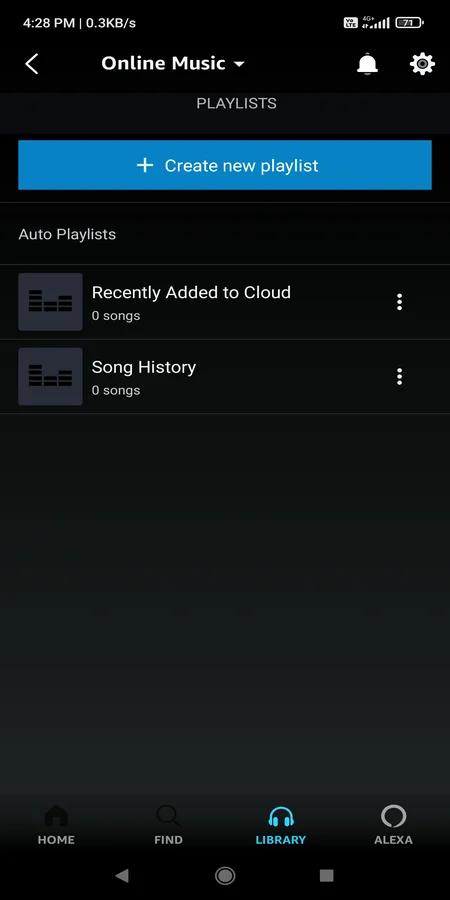
Step 3: Select + Create a new playlist and enter a playlist name of your choice. Click or tap on Save.

Step 4: You will notice that the playlist you just made has been listed under Your Playlists section.
Step 5: To add songs to your newly created playlist, click/tap on the three-dot icon while playing a song and select Add to playlist from the list of available options.
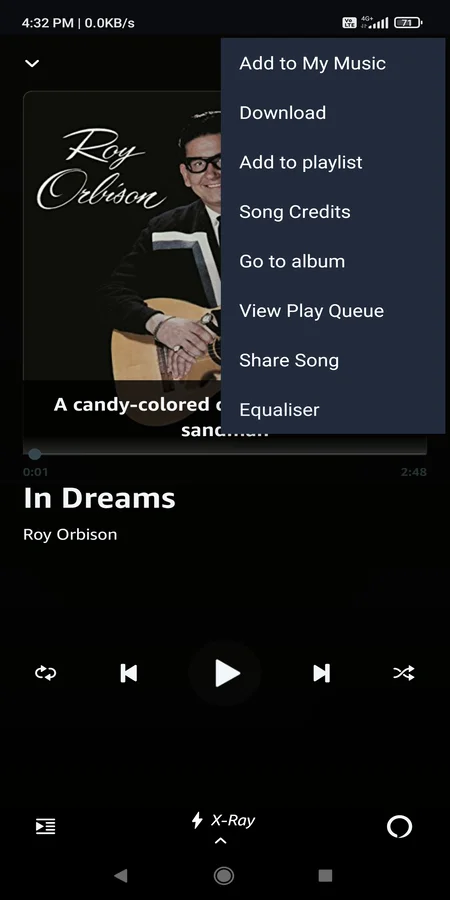
Step 6: Select the playlist folder in which you want to add the song.
Step 7: Lastly, check your playlist folder to confirm if the song has been added.
Transferring your playlists from one platform to another is never a daunting task if you figure out the most efficient way to do it. I hope this article was helpful in guiding you through the entire process.
Leave a comment down below if you face any issues during the transfer procedure. Our team will be sure to help you out!