

A spotty or unstable Internet connection on your PC can be quite frustrating especially if your active participation lies in gaming and other productivity-based sessions. While many of us tend to believe that these intermittent connectivity issues arise from our ISP (Internet Service Provider) or Network devices, Windows 10/11 can, at times, be the main culprit behind such anomalies.
With that said, there are a bunch of effective tweaks using which you can make the most out of your current Internet plan on the Windows Operating System. To get yourself acquainted with these methods, the following sections of this article will provide a detailed step-by-step guide on how to increase your Internet speed in Windows 10/11.
Without further ado, let’s get started!
6 Essential Tips and Tricks to Increase Your Internet Speed in Windows 10/11
Before you start tinkering with any of the Network and Connectivity settings inside Windows 10/11, ensure that the Operating System is updated to the latest stable build.
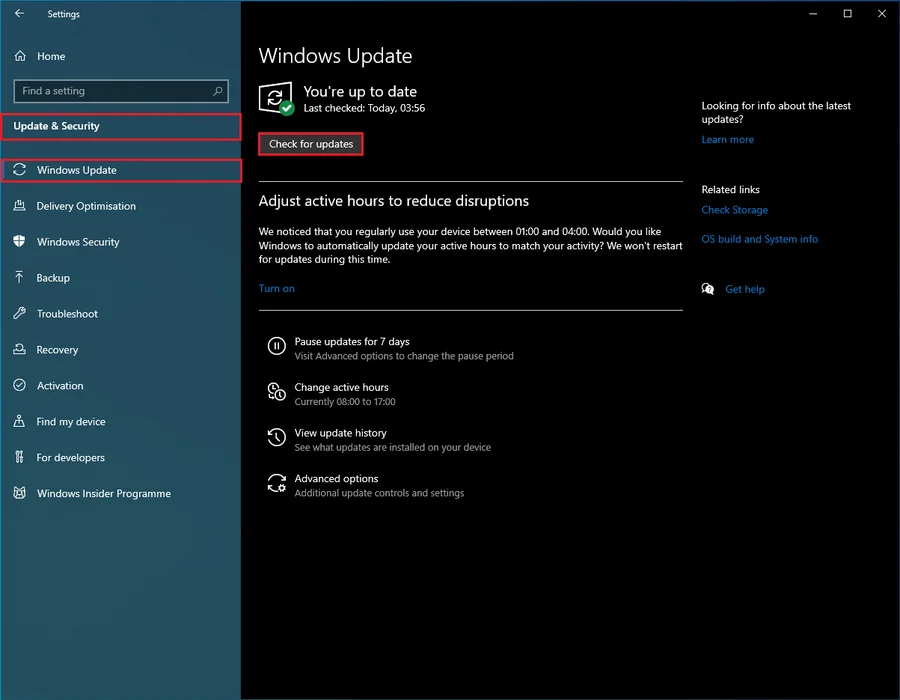
From the Desktop, navigate to the Settings app and click on Update & Security if you’re using Windows 10 as your primary OS or Windows Update if you’re on Windows 11. After that, click on the Check for Updates option to see if there are any pending Windows updates to be installed on your PC.
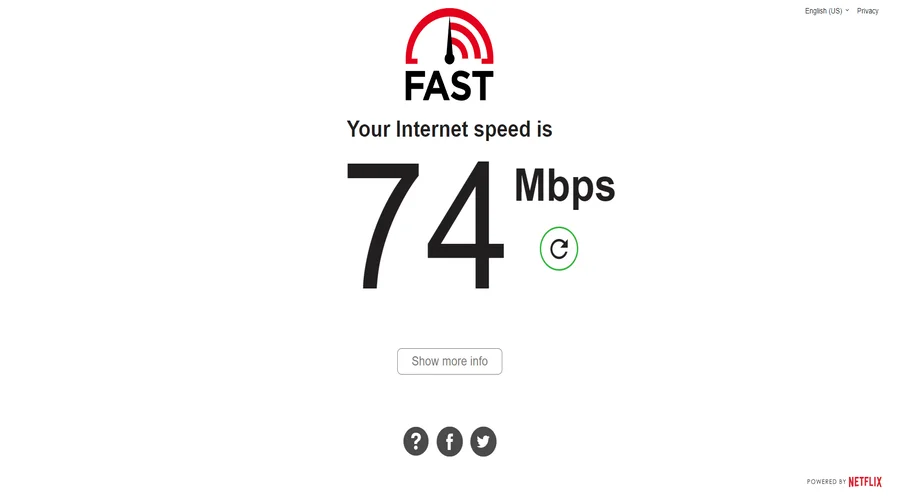
As a general recommendation, consider running a few network-specific speed tests to check the stability of your Internet connection. Both SpeedTest and Fast are versatile speed-testing websites that determine the status of your network connection based on three parameters: Ping (measured in ms), Download, and Upload Speeds (measured in Mbps).
1. Disable Background Applications in Windows 10/11
To prevent unnecessary Background Applications in Windows 10/11 from consuming valuable Internet bandwidth, follow the steps listed down below:
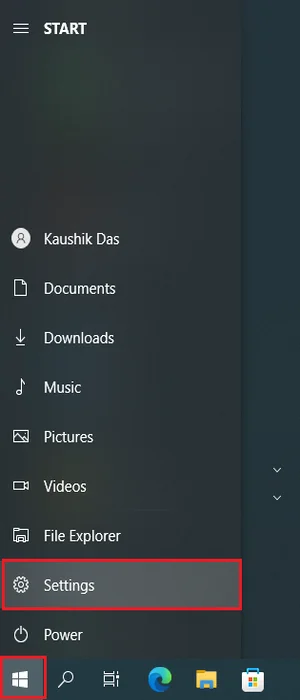
Step 1: From the Home Screen, click on the Start button and then on Settings. Alternatively, press the Windows+I keys on your keyboard to open the Settings app.
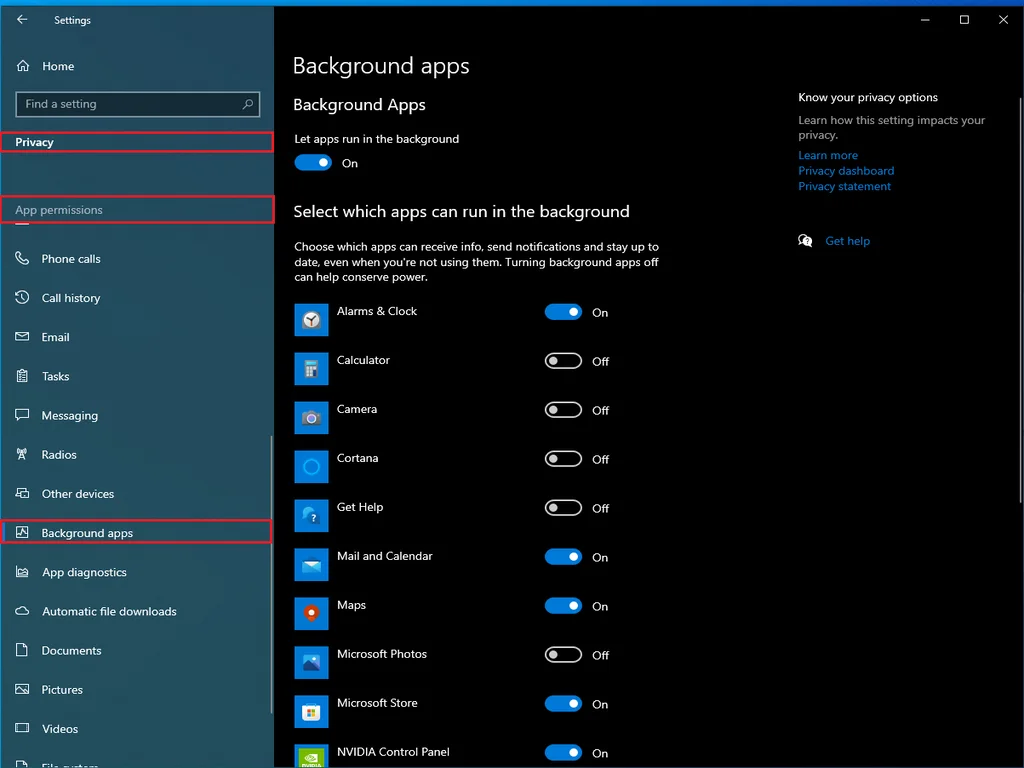
Step 2: For Windows 10 users, click on Privacy and select Background apps from the App permissions section.
For Windows 11 users, click on Apps and then on Apps & features to gain access to all the applications running in the background.
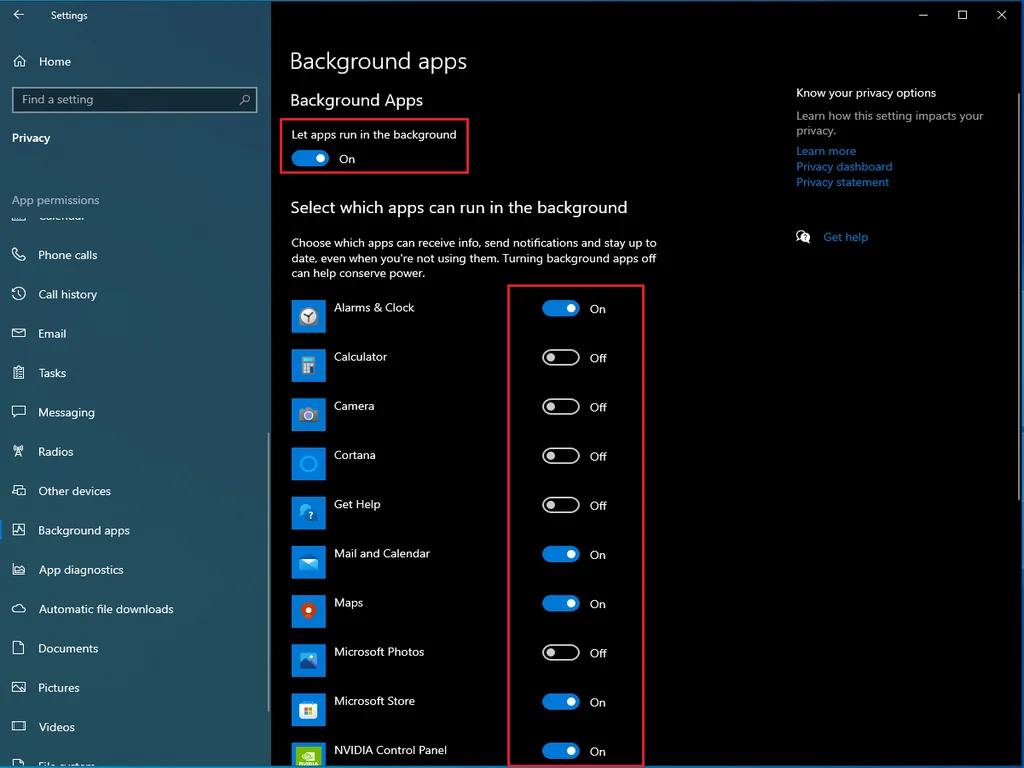
Step 3: If you’re on Windows 10, click on the toggle button adjacent to each application to prevent them from running in the background.
If you are on Windows 11, click on the ellipsis (vertical three-dot icon) next to an application and select Advanced options. Under Background apps permissions, click on the drop-down menu and select Never from the available list of options.
2. Disable Metered Connection in Windows 10/11
If you’re using a network connection that has certain data limits set by your ISP, Metered Connection can help reduce data usage by a significant margin. However, the feature is also infamous for its impact on the overall network speed of your PC.
To disable Metered Connection in Windows 10/11, follow the steps listed down below:

Step 1: From the Home Screen, click on the Start button and select Settings. Alternatively, press the Windows+I keys on your keyboard to open the Settings app.
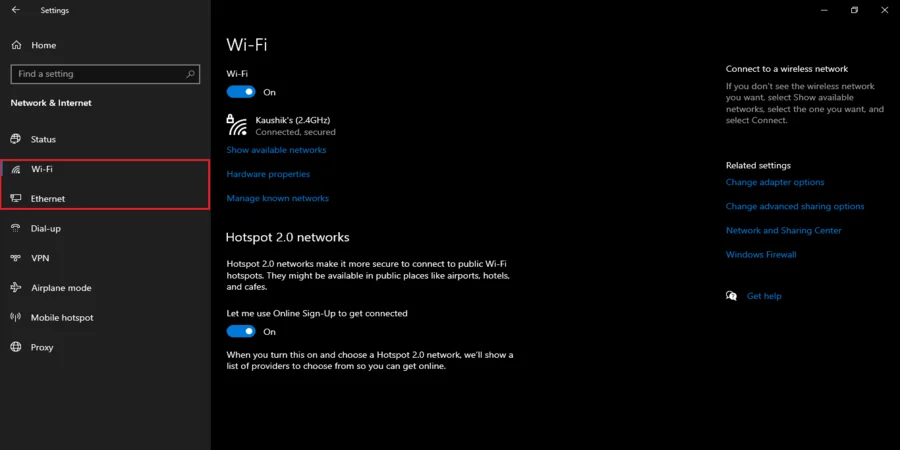
Step 2: Navigate to Network & Internet and select Wi-Fi or Ethernet depending upon your Network Type: Wired or Wireless connection.
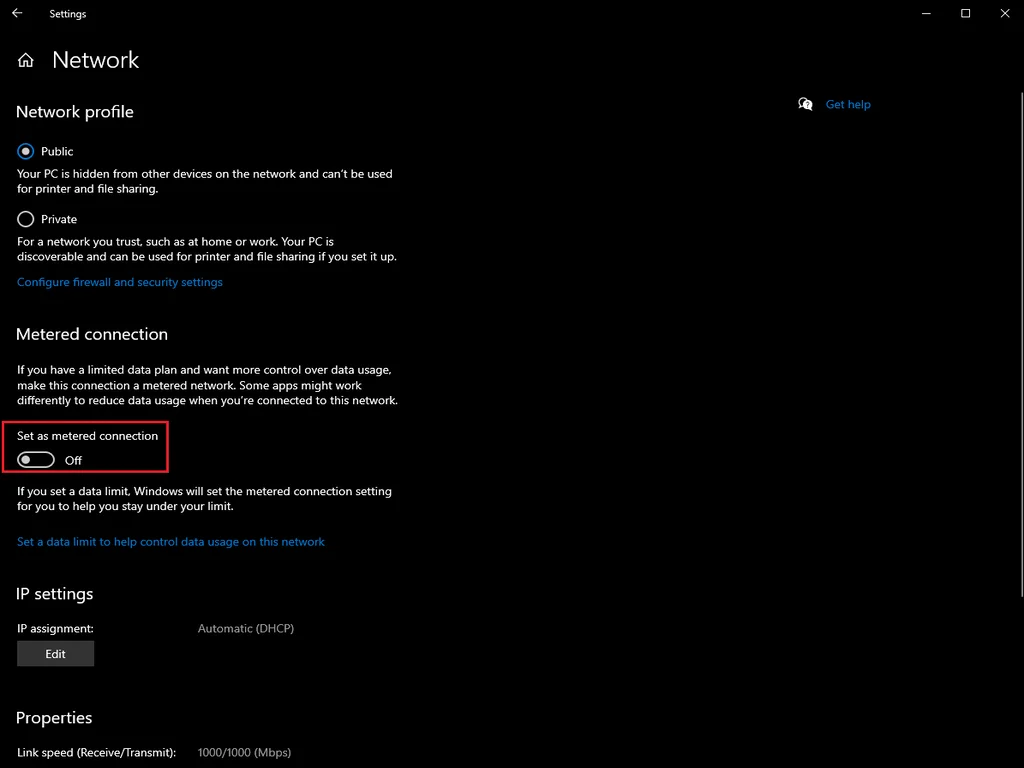
Step 3: Inside Network, look for an entry titled Metered connection and click on the toggle button underneath that option to disable this feature entirely from your PC.
3. Disable Delivery Optimization in Windows 10/11
Delivery Optimization is a peer-to-peer client update service available on Windows 10/11 that combines partial bits of data from Microsoft‘s Data Center to speed up the update process on a PC. However, the service is also notorious for affecting the Upload and Download speeds on a network by a considerable margin.
To disable the Delivery Optimization service from your PC, follow the steps listed down below:

Step 1: From the Home Screen, click on the Start button and then on Settings. Alternatively, press the Windows+I keys on your keyboard to open the Settings app.
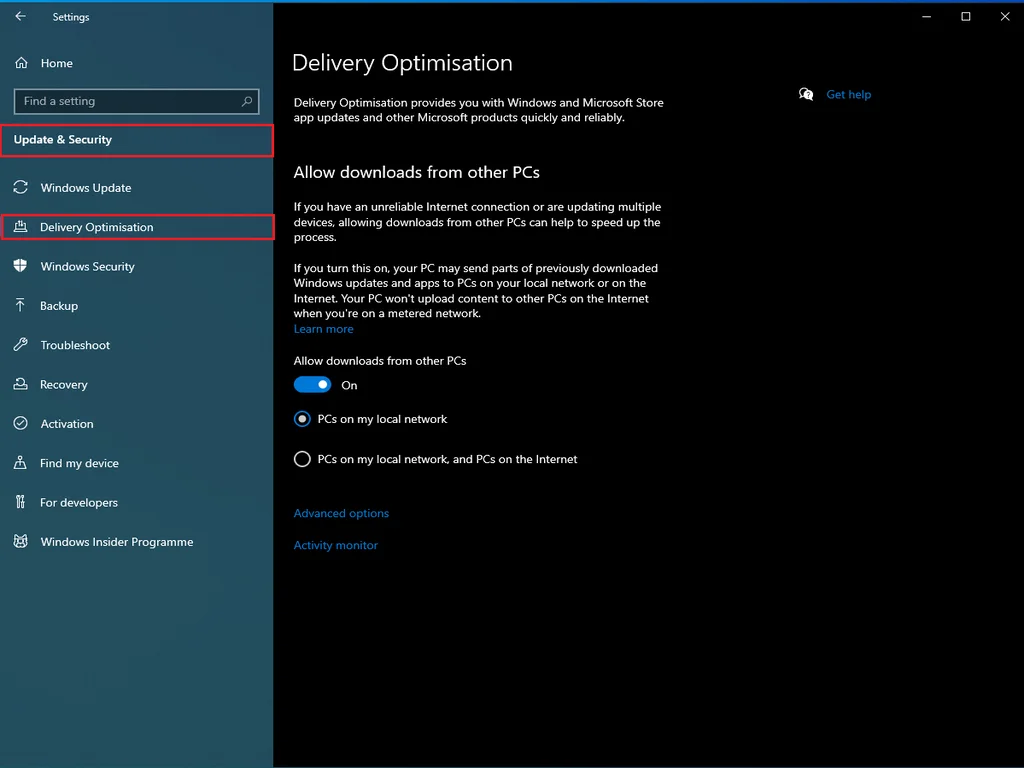
Step 2: For Windows 10 users, click on Update & Security and select Delivery Optimization from the left panel.
For Windows 11 users, navigate to Windows Updates>Advanced options and click on Delivery Optimization located under Additional options.
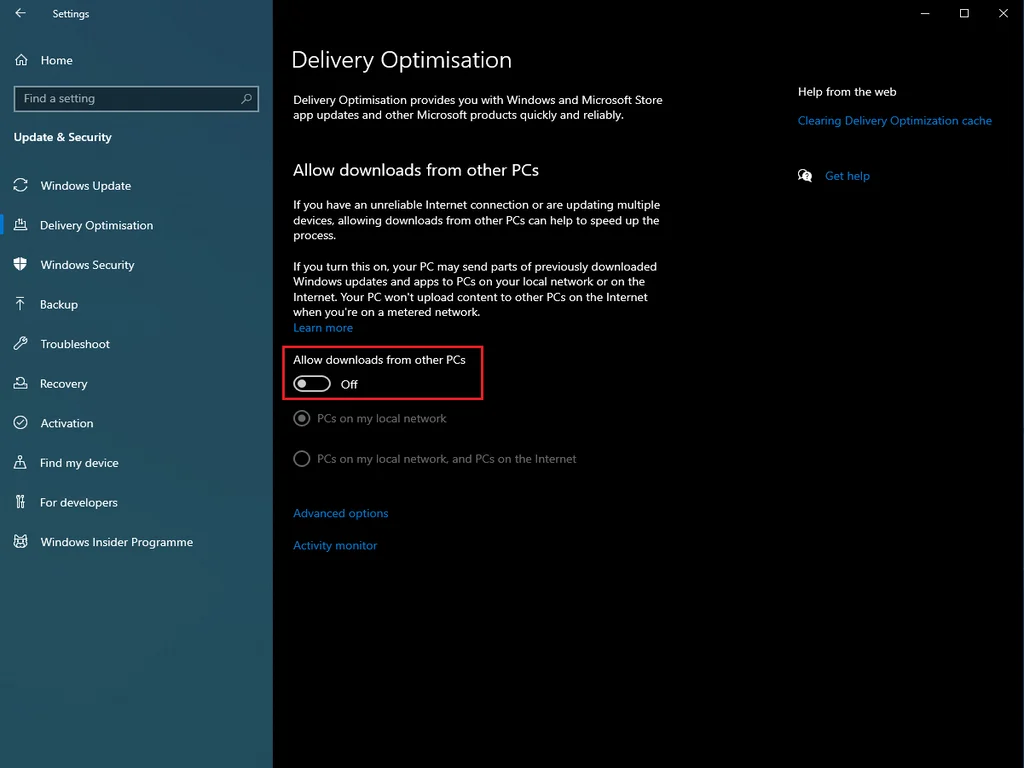
Step 3: To limit your Internet Bandwidth for Windows Updates, click on the toggle button next to the entry titled Allow downloads from other PCs. Disabling the Delivery Optimization feature will help reclaim additional Internet resources that were in use by alternate sources on the network.
4. Modify DNS Servers in Windows 10/11
Using a faster, reliable DNS server than the one assigned by your ISP is often considered to be a quick and easy way to improve the responsiveness of your network connection without compromising its privacy and security standards.
To change your pre-existing DNS Server in Windows 10/11, follow the steps listed down below:

Step 1: From the Home Screen, click on the Search Bar or press the Windows+S keys simultaneously on your keyboard.
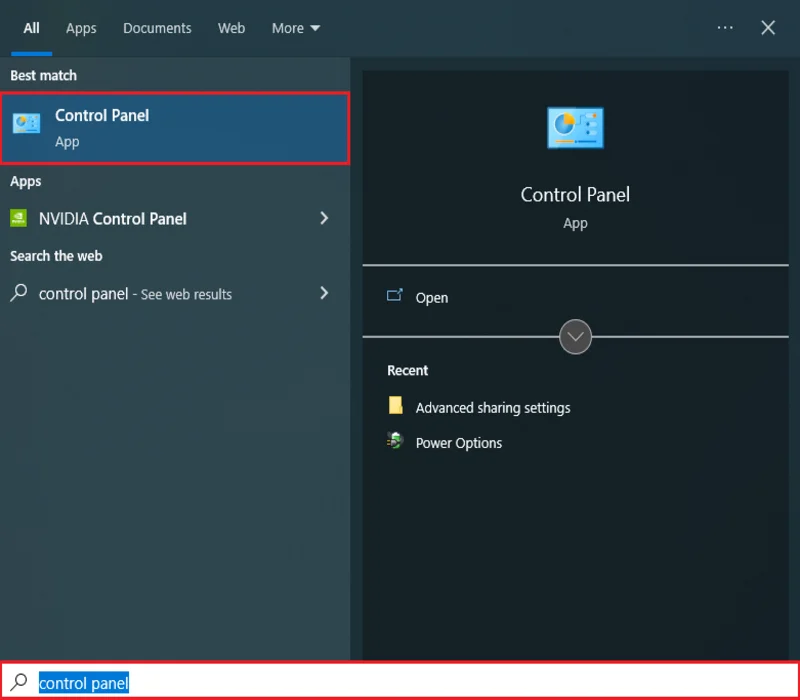
Step 2: Type control panel in the Search Bar and hit Enter to gain access to the Control Panel on Windows 10/11.
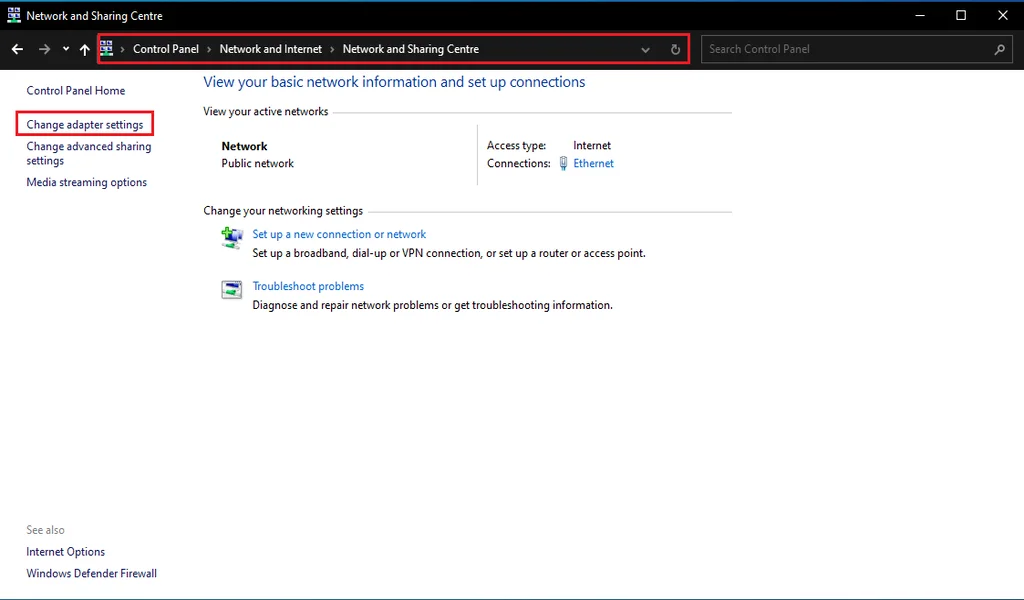
Step 3: Navigate to Network and Internet>Network and Sharing Center and click on Change adapter settings from the left pane.
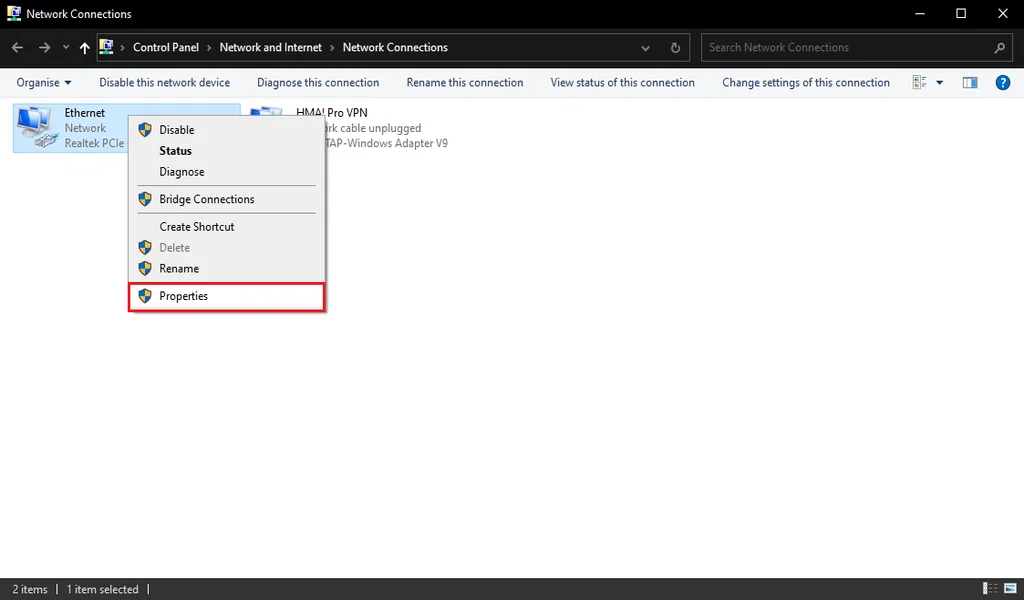
Step 4: Right-click on the Network (Wi-Fi or Ethernet) that you’re using and select Properties from the drop-down menu.
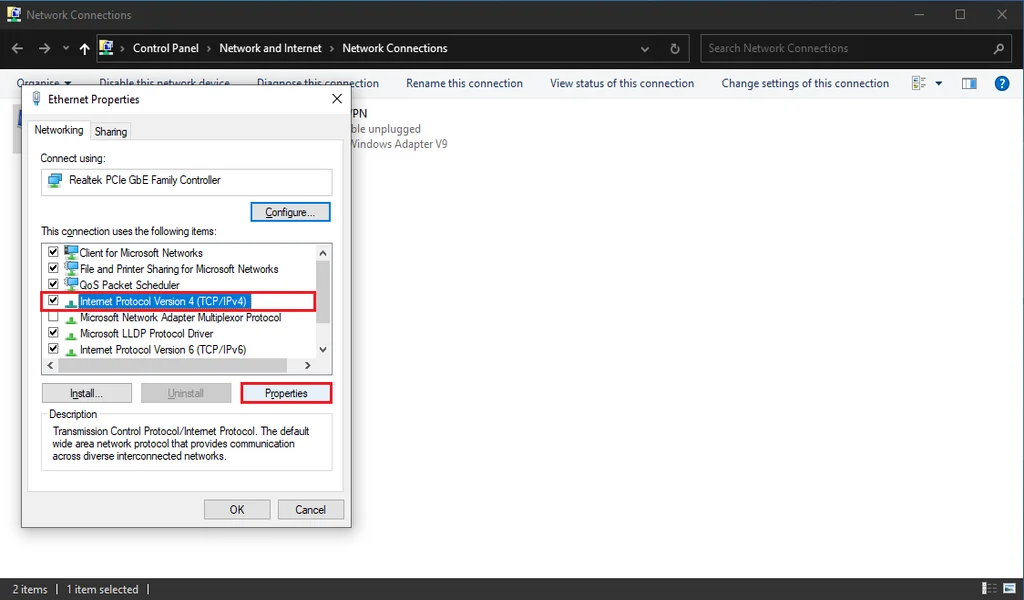
Step 5: Inside Networking, scroll down and select the option titled Internet Protocol Version 4 (TCP/IPv4). After that, click on Properties to modify additional settings.
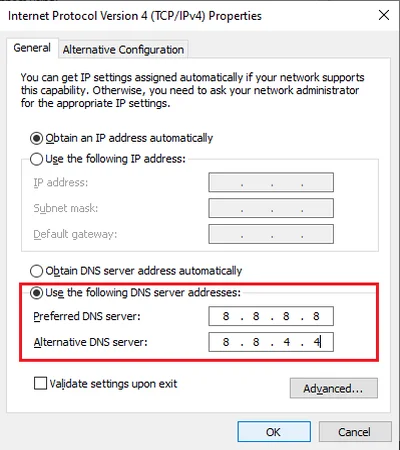
Step 6: Under the General tab, click on the radio button located to the left of an option titled Use the following DNS server addresses. If you’re willing to use Google‘s own Public DNS, enter 8.8.8.8 for the Preferred DNS server and 8.8.4.4 for the Alternate DNS server.
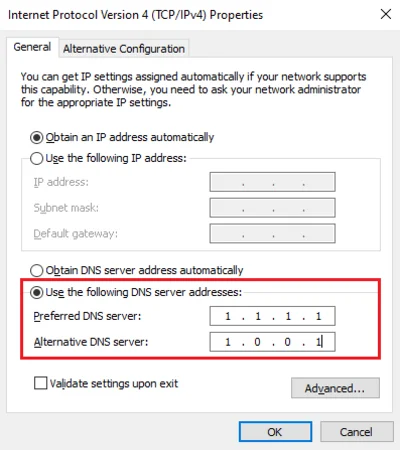
However, if you want to use the Cloudflare DNS service, enter 1.1.1.1 for the Preferred DNS server and 1.0.0.1 for the Alternate DNS server. When you’re done making these changes, click on OK and perform a system reboot to finalize the action.
5. Flush DNS Cache in Windows 10/11
If you’re experiencing slow Internet speeds or having trouble while accessing specific websites from your web browser, it might be related to a corrupt local DNS cache. To flush the DNS cache in Windows 10/11, follow the steps listed down below:
Step 1: From the Home Screen, click on the Search Bar or press the Windows+S keys simultaneously on your keyboard.
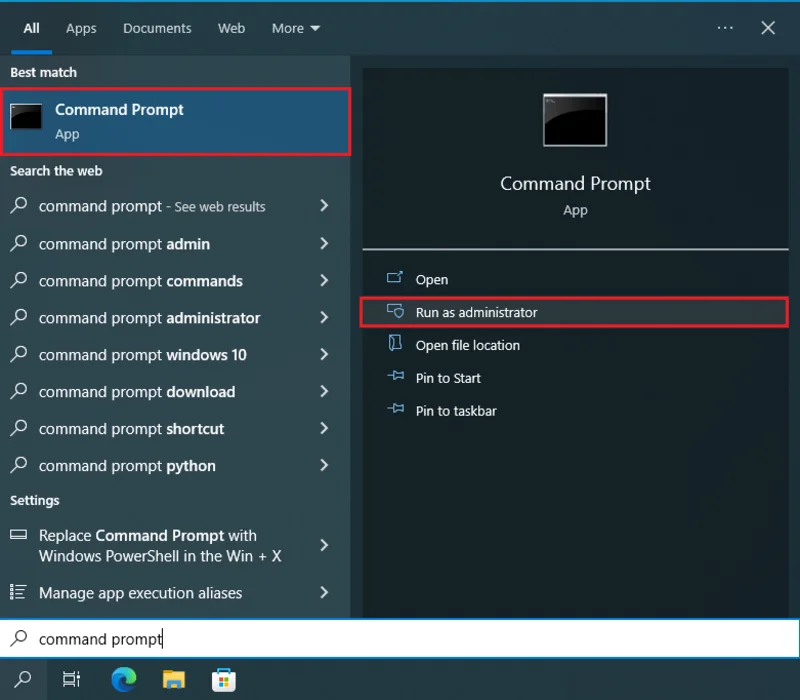
Step 2: Type command prompt in the Search Bar and click on Run as Administrator to open a new Command Prompt window with administrative privileges.
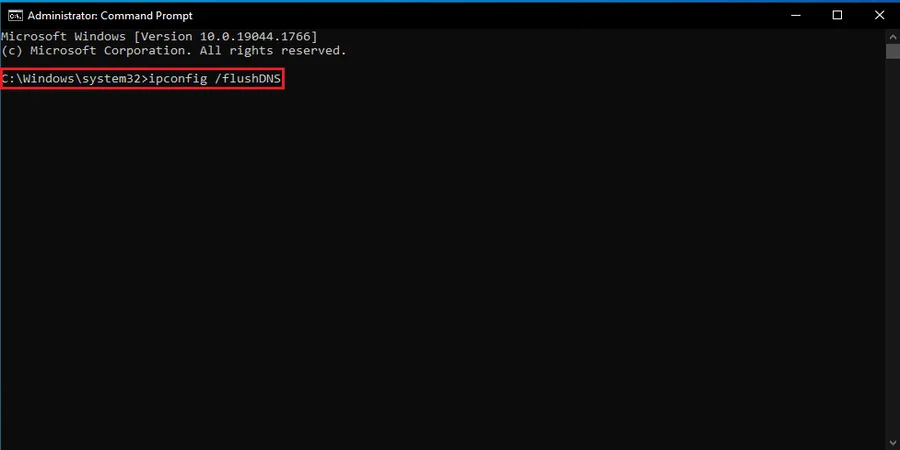
Step 3: Enter the following command inside the Command Prompt window:
ipconfig /flushDNS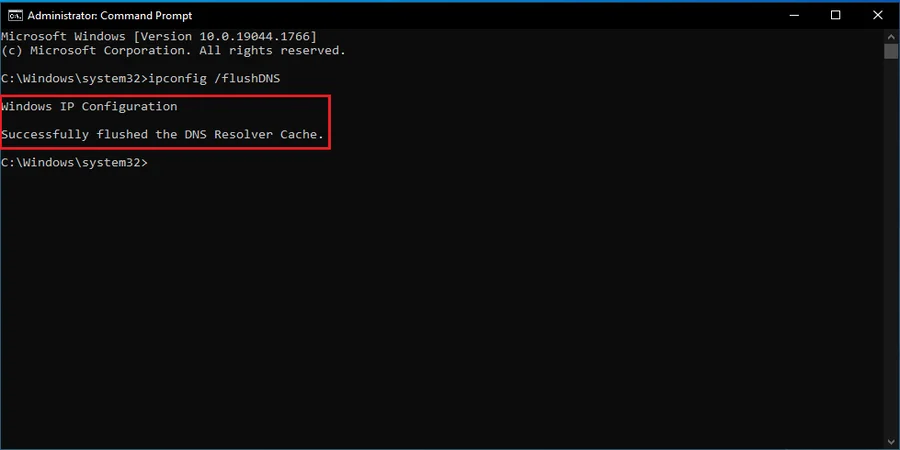
Hit Enter to finalize the changes. You should be able to see a new message under Windows IP Configuration that states, “Successfully flushed the DNS Resolver Cache“.
6. Disable Automatic Updates in Windows 10/11
While cumulative and feature updates in the current version of Windows are crucial for maintaining the overall health of a PC, they can, sometimes, take up a boatload of Internet resources to facilitate their update cycle. To disable Automatic Updates in Windows 10/11 on a temporary basis, follow the steps listed down below:

Step 1: From the Home Screen, click on the Search Bar or press the Windows+S keys simultaneously on your keyboard.
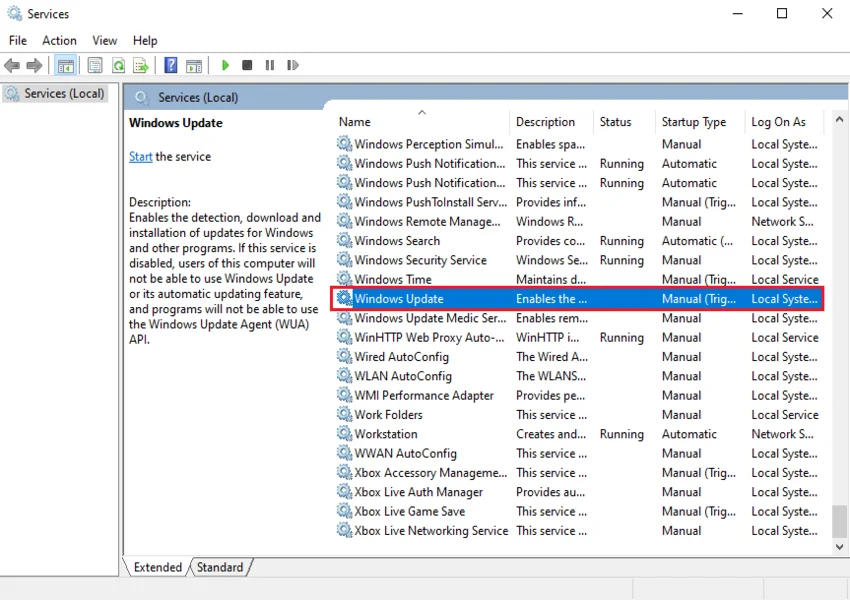
Step 2: Type services in the Search Bar and hit Enter to gain access to the Services program on Windows 10/11.
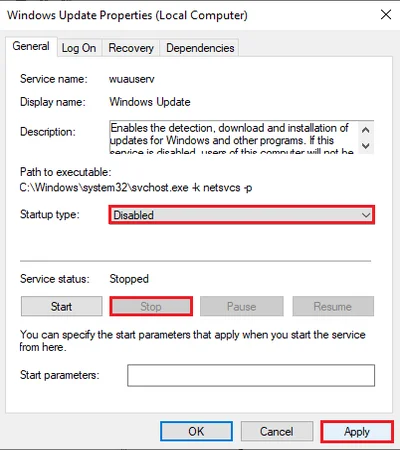
Step 3: Scroll down to the bottom of the page and look for an item titled Windows Update. Double-click on that service to open up the Windows Update Properties.
If the Windows Update service is running, click on the Stop option under Service status. After that, change the Startup type from Automatic to Disabled and click on Apply to save the changes.
Additional Tip: Limit Reservable Bandwidth in Windows 10/11
For those of you who didn’t know, the Windows Operating System keeps away 20% of your overall Internet bandwidth to prioritize multiple system activities that are fundamental to the proper functioning of a PC. However, if you want to limit the Reservable Bandwidth beyond its default values to get a bit more out of your network connection, consider modifying key options inside the Group Policy or Registry Editor.
Limit Reservable Bandwidth in Windows 10/11 Using the Group Policy Editor
If you’re using the Professional or Enterprise edition of Windows 10/11, here’s how to limit Reservable Bandwidth on these versions using the Group Policy Editor:
Step 1: From the Home Screen, press the Windows+R keys simultaneously to bring up the Run command window.
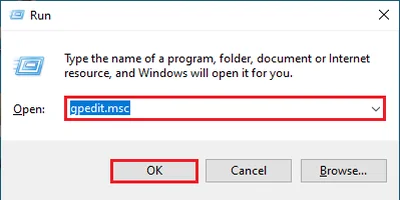
Step 2: Type gpedit.msc in the search box and hit Enter to gain access to the Local Group Policy Editor on Windows 10/11.
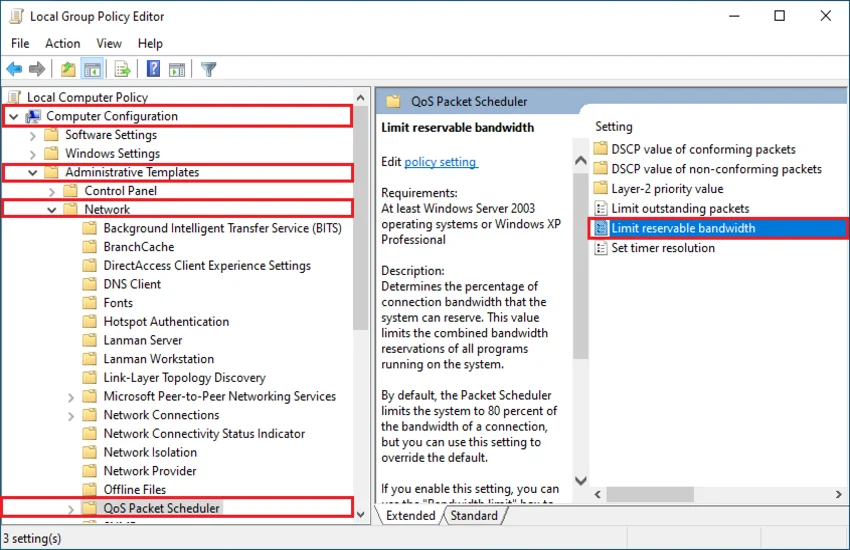
Step 3: Navigate to the left panel and click on Computer Configuration. After that, double-click on Administrative Templates and then on Network.
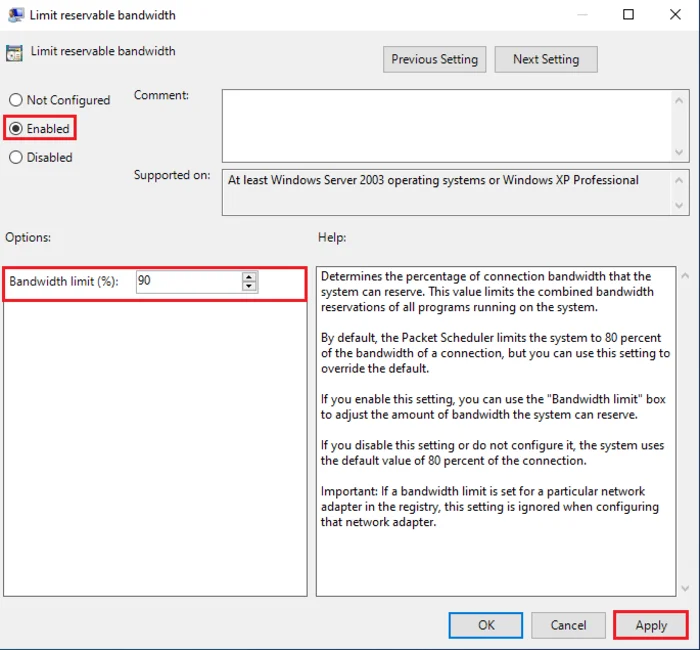
From Network, double-click on QoS Packet Scheduler and then on the entry titled Limit reservable bandwidth. Select the Enabled radio button and set the Bandwidth limit (%) to 90 or 95 based on your preferences.
When you’re done making these changes, click on Apply and perform a system reboot to finalize the action.
Limit Reservable Bandwidth in Windows 10/11 Using the Registry Editor
Since the Group Policy Editor is only available on the Professional and Enterprise editions of Windows 10/11, here’s how to limit Reservable Bandwidth on the Home version using the Registry Editor:

Step 1: From the Home Screen, press the Windows+R keys simultaneously to bring up the Run command window.
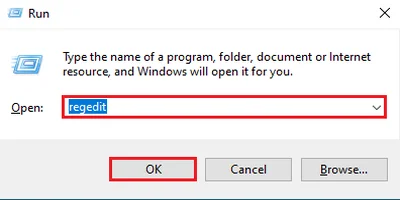
Step 2: Type regedit in the search box and hit Enter to gain access to the Registry Editor on Windows 10/11.
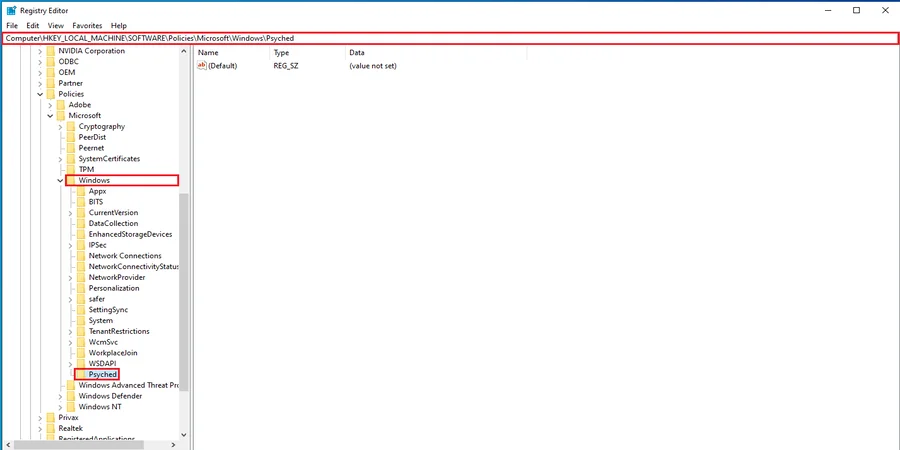
Step 3: From the left panel, navigate to Computer>HKEY_LOCAL_MACHINE>SOFTWARE>Policies>Microsoft and right-click on Windows. Select New>Key and change the name from New Key #1 to Psyched.
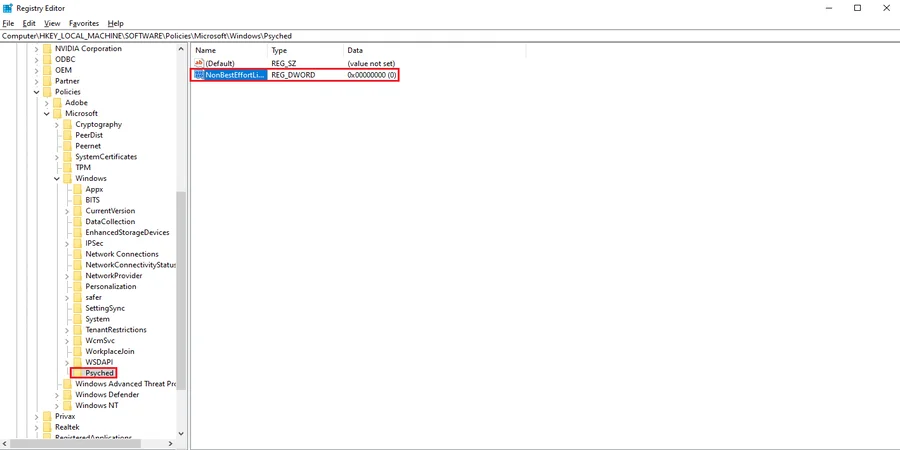
Step 4: Right-click on the Psyched key and select New>DWORD (32-bit) VALUE and name it NonBestEffortLimit.
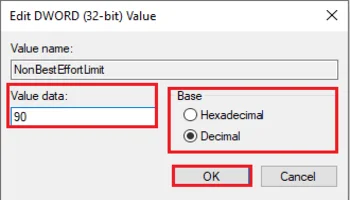
Step 5: Double-click on the NonBestEffortLimit entry and set the Value data to 90 or 95 based on your preferences. Make sure that the Base has been changed from Hexadecimal to Decimal.
When you’re done making these changes, click on OK and perform a system reboot to finalize the action.
By following the aforementioned methods, you should be able to mitigate persistent issues with your network connection on a permanent basis.
Hope you found this article helpful. For more definitive guides on the Windows Operating System, leave a comment down below.