
Following a recent update, the Nvidia GeForce Experience received a massive overhaul to its core functionalities which include a fully-featured GPU monitoring tool along with one-click GPU overclocking support. Not only do these features bring the GeForce Experience in line with AMD’s Adrenalin software suite but they also eliminate the need for any third-party applications to monitor performance in games.
The GeForce Experience Performance and Latency Overlay is an extremely useful tool that displays some of the most critical measurements of your GPU (Clock Speeds, Temperature, Voltage, Utilization, Power, etc.) on a separate tab. Sure it took almost 8 years for Nvidia to integrate such a powerful utility inside GeForce Experience but it’s here now and it’s better than ever!
That said, if you’re looking for a versatile performance monitoring tool for your RTX or GTX-series GPU from Nvidia, then this guide will definitely help you out! In this article, I’ll be listing down all the steps necessary for enabling Performance and Latency Overlay (OSD) using the GeForce Experience application.
Without further ado, let’s get started!
Download & Install the Latest Game Ready Drivers for Your GPU
Before you start tinkering with any of the settings inside GeForce Experience, make sure that you get the latest Game Ready drivers for your GPU. Unlike other driver-based applications, the Nvidia GeForce Experience comes equipped with an Auto-Update feature that notifies the user instantly whenever there is a driver update available for their GPU.
However, if you are not familiar with the entire update process on GeForce Experience, follow the steps listed down below:
(Note: The Nvidia GeForce Experience application requires you to set up an online account to access all of its exclusive features and functionalities)
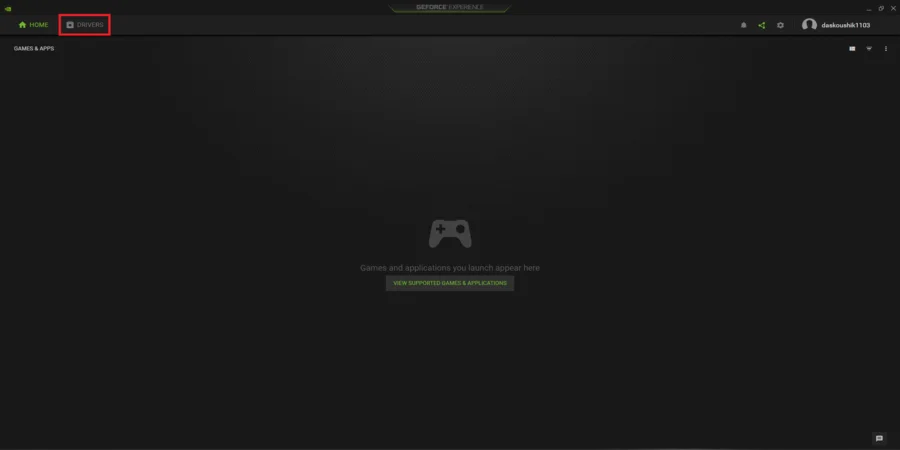
Step 1: Open up the GeForce Experience application on your Desktop or Laptop and click on the Drivers tab, located at the top of the screen.

Step 2: From the Drivers tab, click on the Check for Updates option to see if there are any Game Ready drivers available for your GPU.
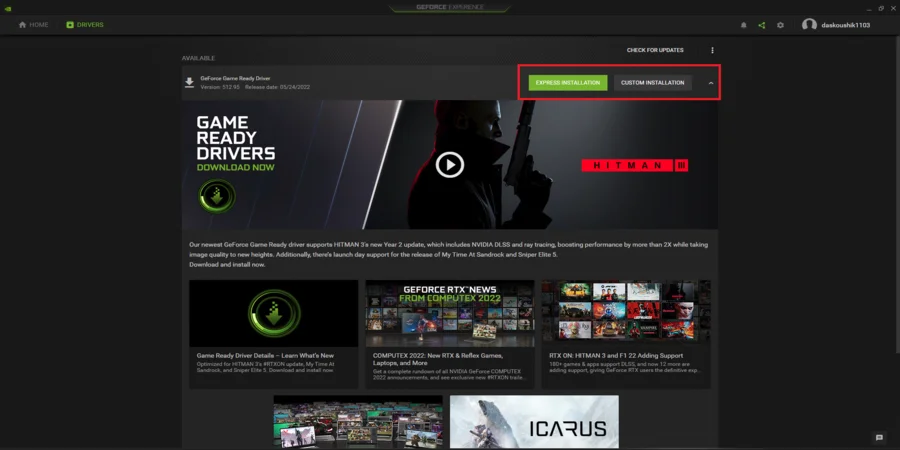
Step 3: When there is a Game Ready driver available for your specific GPU model, GeForce Experience will start downloading the executable file on your PC. Once it’s done, click on Express or Custom Installation to initiate the update process.
That’s it! After a system reboot, the latest Game Ready driver from Nvidia will be installed on your PC.
Enable Performance Overlay With Nvidia GeForce Experience
Now that you’ve updated your GPU drivers to the latest version, enabling the Performance and Latency Overlay from GeForce Experience is fairly simple. Follow these steps:

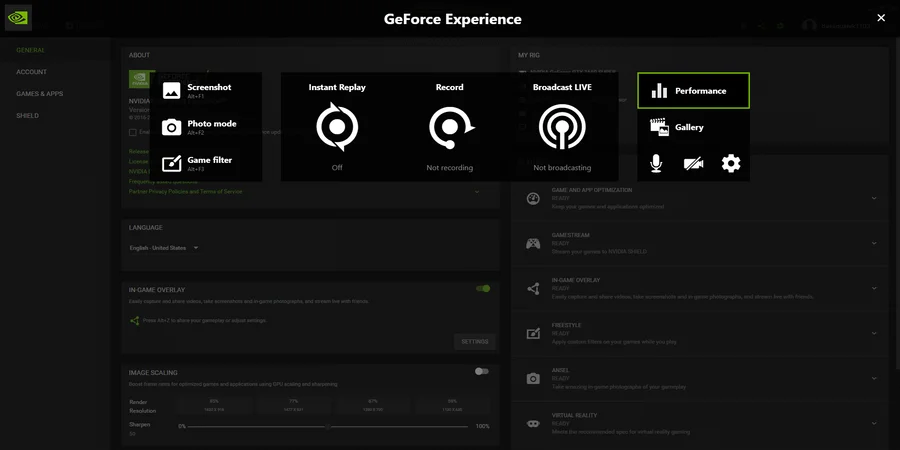
Step 1: From the GeForce Experience application, click on the Gear icon situated right next to your Profile. Doing so will open up the Settings menu which lists some of the most basic options for your GPU.
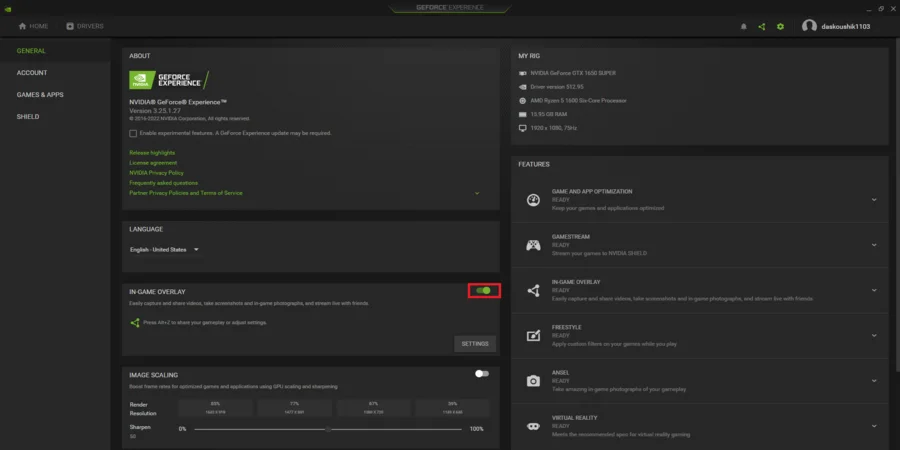
Step 2: Inside the General tab, look for an option titled In-Game Overlay. When you locate the option, click on the toggle switch to activate this feature.
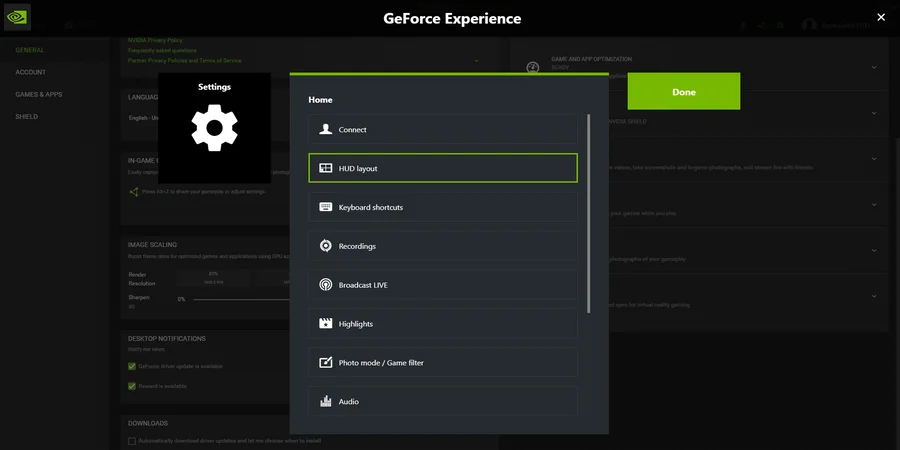
Step 3: Once it’s done, click on Settings underneath that section to bring up a new window where you can customize a wide variety of options based on your preferences. To enable GPU metrics, click on HUD Layout and then on the Performance tab.
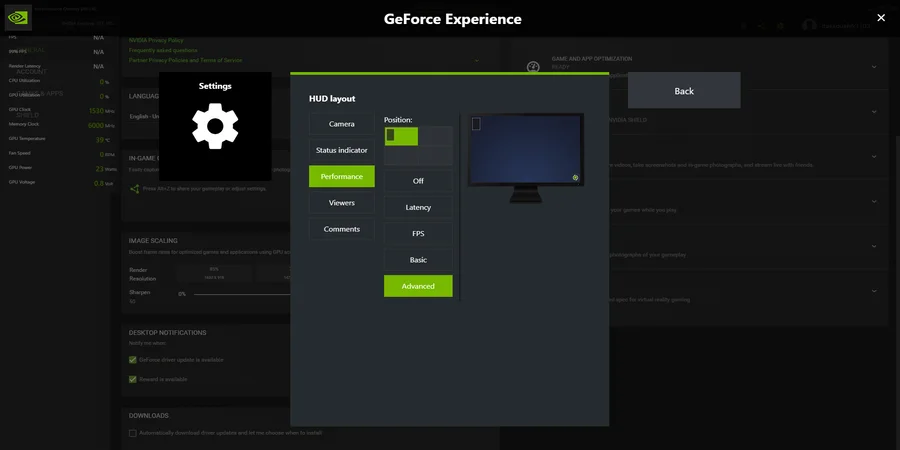
Step 4: From the Performance tab, select any of the four quadrants to confirm the position of the overlay. After that, click on the Basic or Advanced option to adjust the type and volume of information you want to see inside the overlay.
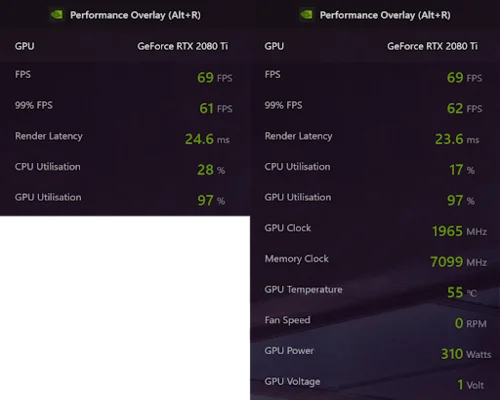
Step 5: While the Basic option displays all the fundamental performance metrics like CPU and GPU Utilization along with in-game FPS and 99th Percentile scores, the Advanced mode takes it up a notch by showcasing additional information such as GPU and Memory Clocks along with Temperature and Voltage measurements.
Nevertheless, once you’re done with these modifications, save your changes and exit the application.

That should do the trick! When you fire up a game of your choice, the Performance and Latency Overlay will show relevant GPU statistics in any one of the quadrants you selected earlier.
However, if the overlay doesn’t appear at all when launching a game, press the Alt+R keys on your keyboard and you should be good to go! Besides performance monitoring, the GeForce Experience application hosts a bunch of essential utilities that allow you to record, stream and even share your gameplay with friends.
Additional Tip: Enable Automatic Performance Tuning with Nvidia GeForce Experience
As mentioned earlier, the Nvidia GeForce Experience incorporates a new one-click overclocking feature that lets you squeeze more performance out of your existing RTX or GTX-series GPU. Although the Performance Tuning utility was initially released on an experimental basis to test out the overclocking standards of all the RTX-30 and 20-series GPUs from Nvidia, it made its way to older cards later down the line.
For those users who want to maximize their GPU performance without resorting to the perils of manual overclocking, here’s how to automatically overclock an RTX or GTX-series GPU with the GeForce Experience Performance Tuning feature.
(Note: As a general recommendation, download and install the latest Game Ready drivers for your GPU from Nvidia’s Official Website or using GeForce Experience to prevent any incompatibility issues)
Step 1: Open up the GeForce Experience application on your PC and head over to the Settings menu by clicking on the Gear icon located right next to your Profile.

Step 2: Inside the General tab, make sure that the In-Game Overlay option is enabled. If not, click on the toggle switch to activate this feature.
Step 3: To summon the GeForce Experience Overlay, press the Alt+Z keys on your keyboard and click on the Performance option situated to the right of your screen.
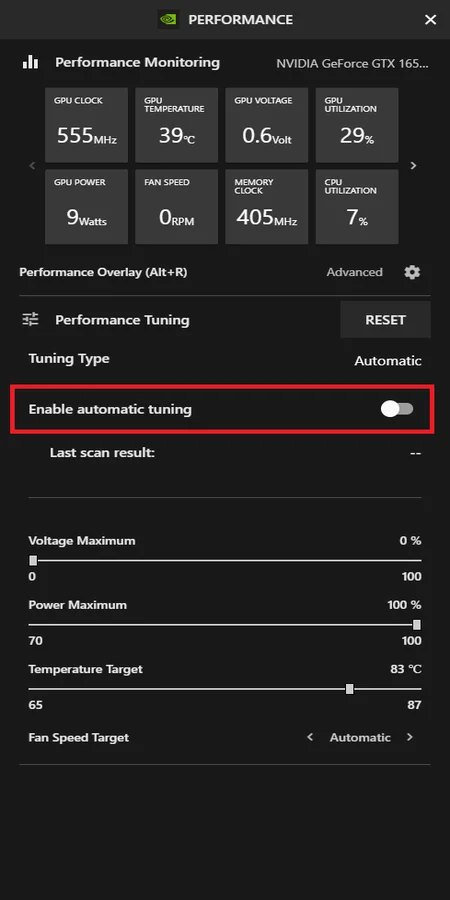
Step 4: Once the Performance overlay appears, look for an option titled Enable Automatic Tuning. When you find the option, click on the toggle switch to initiate the overclocking process.
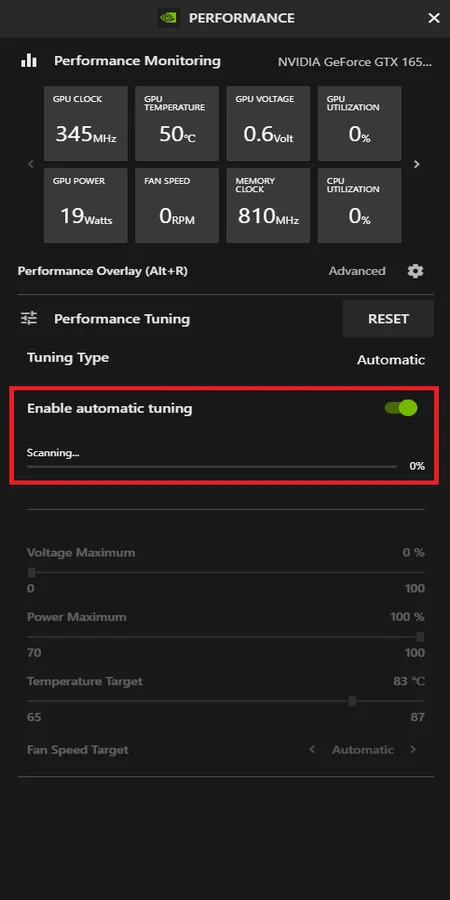
Step 5: As this utility makes use of an advanced scanning algorithm to detect the appropriate Core and Memory frequencies for your specific GPU model, the entire procedure may take a while to complete.
Upon completion, consider taking a look at the Scan Result to get a better idea of the Core and Memory Clock improvements brought about by this tool. If you aren’t satisfied with the overall performance gains across the board, try pushing the Power and Temperature Limits to their maximum values and run the test again to check for any noticeable improvements.
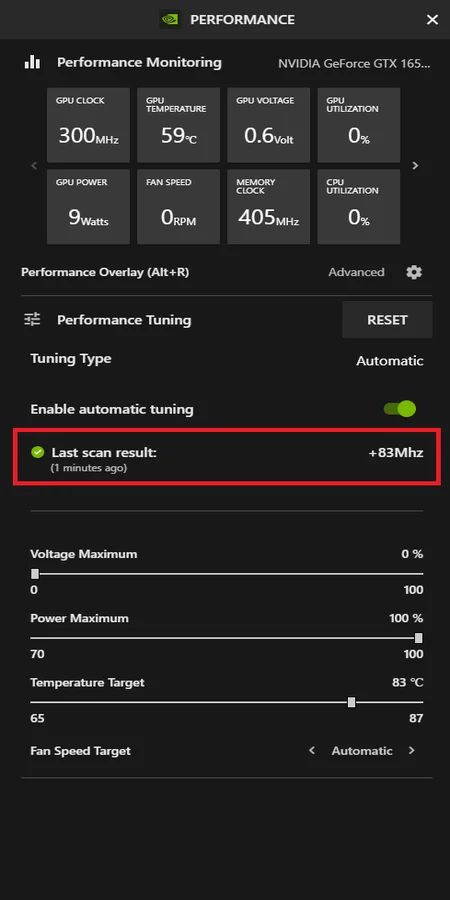
Nevertheless, I tested out the GeForce Experience Performance Tuning feature with a more budget-oriented GTX 1650 Super and found the Scan Result to be quite surprising. As is evident from the image, the GTX 1650 Super managed to gain a slight increase in its Core Clock at around 83Mhz which should translate to about 5-10% improvements across most 3D applications and games.
Since the GeForce Experience Performance Tuning utility is extremely conservative in its overclocking standards, it won’t push the Memory or Core frequencies anywhere near the limit of their capabilities. As a result, the program is rock solid when it comes to reliability and overall system stability.
That should wrap it up nicely! I hope you found this guide useful. If you encounter any issues while modifying key settings inside the GeForce Experience application, feel free to leave a comment down below.