

The Basic Input/Output System, commonly referred to as BIOS, is an extremely small piece of code that resides in a read-only or flash memory chip on your motherboard. The moment you turn on your PC, BIOS is the first thing that springs to life by initializing and validating all the hardware components before booting into the Operating System. Think of it as a closely linked fusion of hardware and software.
Likewise, the Unified Extensible Firmware Interface or UEFI is a more, modern iteration of the conventional BIOS standard that integrates several key features over its predecessor. While the Legacy BIOS mode is severely limited in terms of storage capacity and user interface, the UEFI mode can boot from disk drives over 2TB in capacity and hosts an actual GUI (Graphical User Interface) along with networking capabilities.
That said, most motherboard manufacturers nowadays offer firmware updates in an attempt to fix stability issues, improve memory compatibility, add new features and even protect your system from security vulnerabilities. Although BIOS updates aren’t necessary if you’re already running a PC with the latest and greatest hardware, they can, at times, be crucial if you’re planning to install a current-gen CPU on a previous-gen motherboard.
Therefore, the following sections of this article will provide a detailed, step-by-step guide on how to update the UEFI/BIOS on your motherboard using a USB thumb drive.
Prerequisites for a UEFI/BIOS Update
Before delving into the steps necessary for a UEFI/BIOS update, it is recommended that you get yourself acquainted with the entire procedure. While a UEFI/BIOS update can be performed in a matter of minutes, there are a number of things that you need to keep in mind to ensure that the update process is devoid of any interruptions.
1. Identify the Make & Model of Your Motherboard
To know the exact make and model of your motherboard, open Command Prompt in Windows by typing cmd in the Search Bar or the Run tab. Once you’ve done that, enter the following command inside the text field:
wmic baseboard get product,manufacturer,version,serialnumber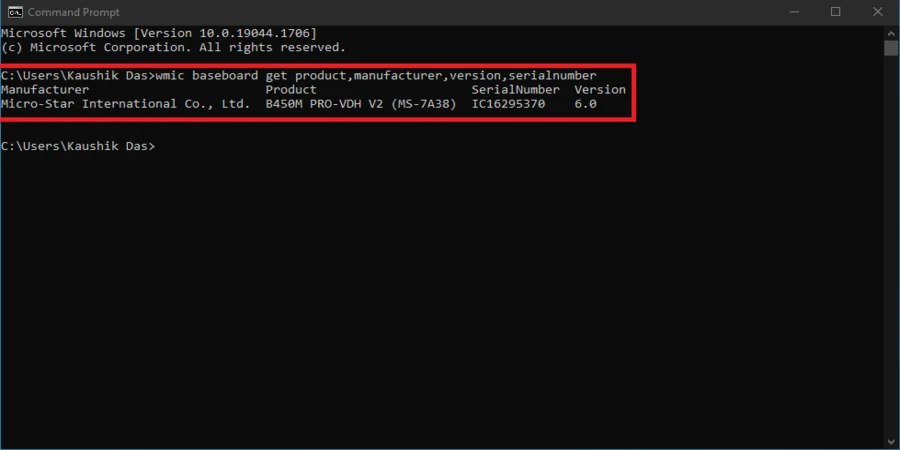
(Note: Remember to not put spaces between the modifiers like ‘product’, ‘manufacturer’, ‘version’, and ‘serial number’. All of them should be separated using a comma)
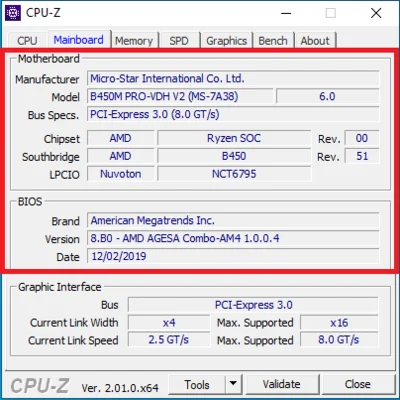
Alternatively, you can use a third-party application such as CPU-Z to find additional information about your motherboard. By simply downloading and installing this freeware service from its official website, you’ll be able to check out your motherboard’s manufacturer, model, chipset, and even the BIOS version.
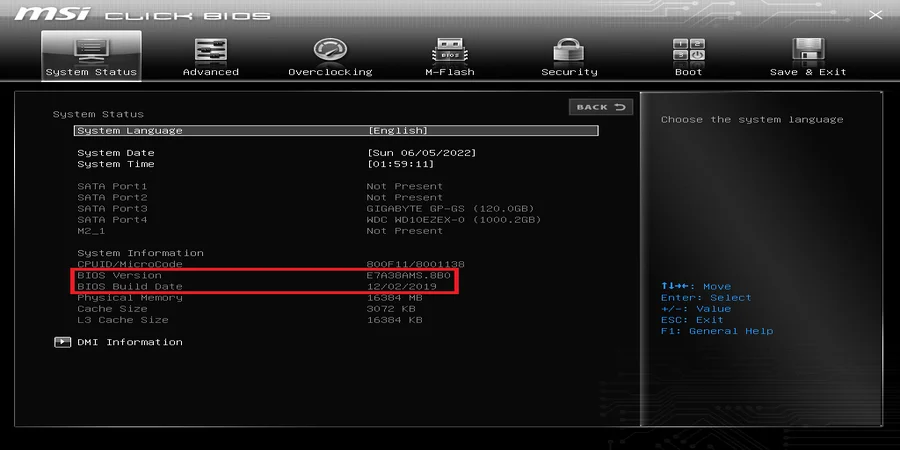
2. Check the Current BIOS Version of Your Motherboard
Besides Command Prompt and CPU-Z, it is possible to find out the current BIOS version of your motherboard inside System Information. Hold down the Windows+R keys to bring up the Run command window. After that, type in msinfo32 to open the System Information tab on your PC.
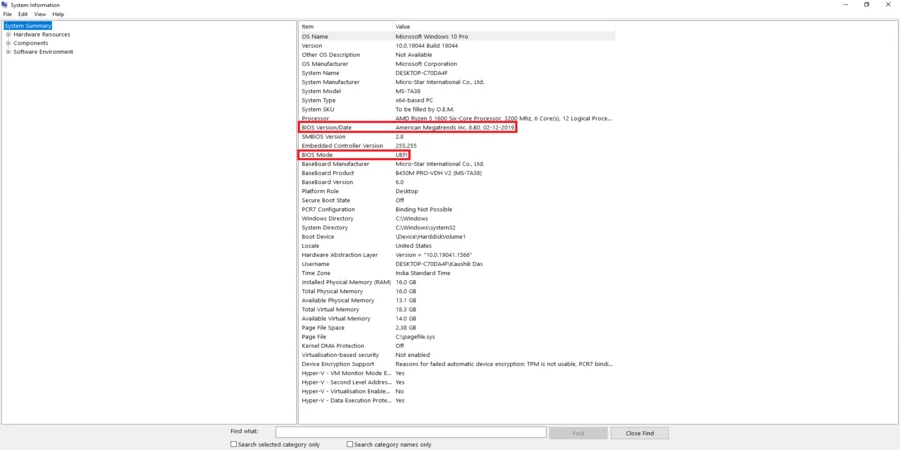
From the System Information tab, select System Summary on the left and look for the entry BIOS Version/Date on the right. Additionally, you can check whether your motherboard’s BIOS is set to UEFI or Legacy mode from the field titled BIOS Mode. For most motherboards of this generation, UEFI is considered to be the default mode due to its forward and backward compatible feature set.
Take a note of all the relevant values from the System Information window for further comparison against the latest BIOS version present on your motherboard manufacturer’s website.
3. Download the Latest Firmware Update From Your Motherboard Manufacturer’s Website
From your preferred web browser, head over to the motherboard manufacturer’s website and navigate to the Support page. You should be able to locate a separate BIOS section that categorizes all firmware revisions provided by your motherboard’s manufacturer based on their release date.
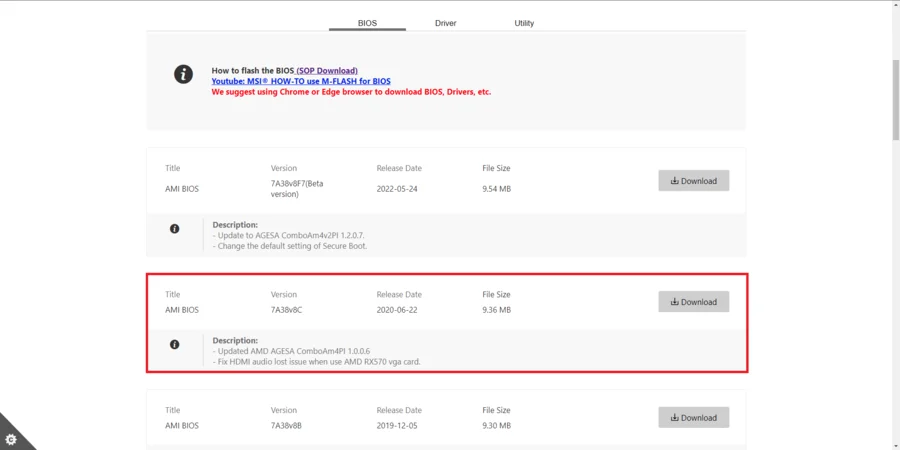
If you come across a BIOS update that is newer than your current version, consider reading through the entire description to gain a better understanding of the functional enhancements tied to that firmware. Whenever you’re certain about the update process, download and extract the zip file on a spare USB flash drive.
On an additional note, make sure that the USB stick has been formatted using the 32-bit version of the FAT file system to avoid any unwanted error messages. Moreover, try copying just the BIOS file into the thumb drive instead of carrying over the entire folder as some flash utility programs aren’t designed to read the firmware directly from a folder.
Update the UEFI/BIOS on Your Motherboard Using a USB Flash Drive
Updating the UEFI/BIOS on your motherboard using a USB flash drive is relatively simple. Follow these steps:
(Note: It is advisable to create a backup of all the major settings that were tweaked inside your UEFI/BIOS before initiating the update process)
Step 1: With the USB drive plugged in, restart your PC and hit the Delete or F2 key once the initial boot screen appears. This will take you to the UEFI/BIOS Settings menu.
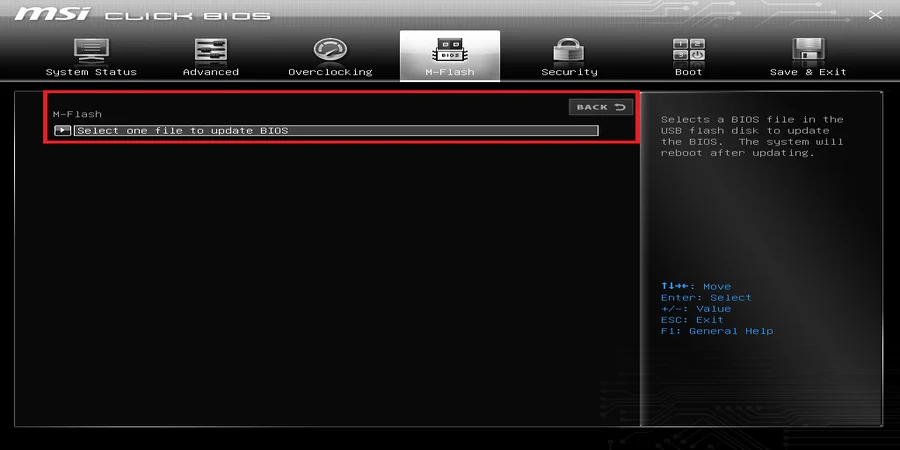
Step 2: From the Settings menu, navigate to and select the appropriate flash utility tool provided by your motherboard’s manufacturer (EZ Flash/M-Flash/Q-Flash or Instant Flash).

Step 3: The flash utility program will list your USB thumb drive along with the firmware present inside it. Select the file and press the Enter key to confirm your action.

Step 4: After a system reboot, the firmware update process will begin automatically. As a general recommendation, try connecting your PC to an Uninterruptible Power Supply or UPS to safeguard the entire procedure from any untimely interruptions.
That’s it! Once the UEFI/BIOS update is successful, go back to the Setup screen and restore any pre-existing settings and/or values manually or by loading a saved profile.
Although there are a few alternate methods to update the UEFI/BIOS on your motherboard using Command Prompt or a .exe file, their credibility is often at stake. For instance, creating a bootable USB drive in Windows that contains the firmware along with a discrete set of script codes for flashing the UEFI/BIOS is as tedious a process as it sounds.
On the flip side, running an executable file in Windows for updating the firmware on your pre-built PC or Laptop might seem like a no-brainer but there are a couple of security risks associated with the procedure. Not only can an Antivirus service hinder the update process by marking the executable as a potential threat to your system but certain background applications also have a chance of interfering with the read and write functions altogether.
To prevent such issues from jeopardizing the whole operation, you can either opt for the aforementioned USB stick method which is arguably the most reliable way of updating the UEFI/BIOS on your motherboard, or perform the same task via the Internet.
For those of you who are unaware of this technique, almost all mid-range to high-end motherboards from ASUS enable firmware updates by means of an Internet connection. Their built-in UEFI/BIOS flashing tool dubbed EZ Flash 3 is responsible for carrying out the entire procedure without ever needing to rely upon a USB drive or an OS-based utility.
If you own a current-gen motherboard from ASUS that has the EZ Flash 3 utility pre-installed, you’ll be able to update to the latest version of its UEFI/BIOS effortlessly provided that you have a stable network connection with decent upload and download speeds.
What Should You Do When the UEFI/BIOS on Your Motherboard Fails to Update?
Even after following all the precautions and safety measures, the UEFI/BIOS on your motherboard can still fail to update due to an incompatible file or a sudden power outage. The severity of such instances lies in the fact that a firmware which, when corrupted, leads to an inoperable or bricked motherboard.
Now comes the question: Is there any way to resurrect a bricked motherboard from the dead without sending it back to the manufacturer?
Well, there are a bunch of recovery options that mostly act as exclusive features on specific motherboards of this generation. Let us take a look at these features to better understand their purpose in restoring a non-functional UEFI/BIOS to its former state.

- If you’ve purchased a motherboard that comes with a Dual BIOS feature, you should be able to reinstate the corrupted firmware using a backup memory chip. Such motherboards are often equipped with a physical switch that, when toggled, carries over all pre-existing data from the primary BIOS to the secondary BIOS. Once you gain access to the UEFI/BIOS Settings menu, overwrite the corrupted firmware with a fresh copy of the file stored in your USB flash drive.
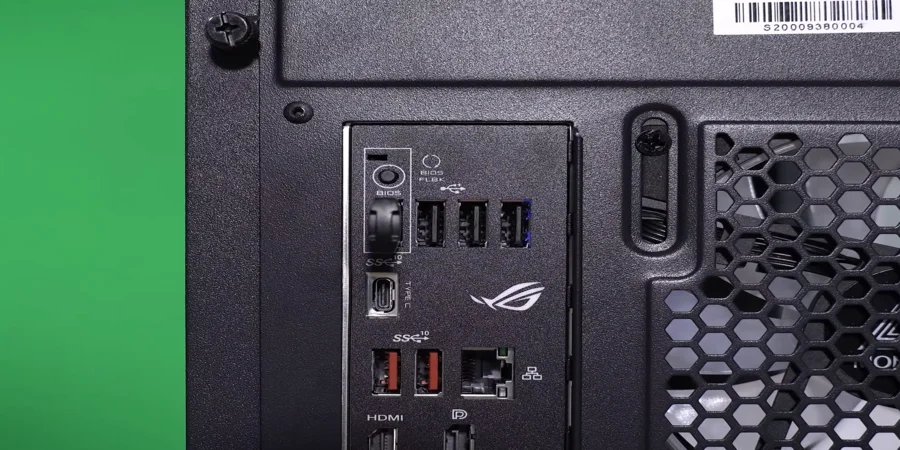
- In a similar fashion, modern motherboards make use of a BIOS Flashback feature that can help recover corrupted firmware by integrating a dedicated button on their I/O panel. To flash the UEFI/BIOS on such motherboards, download a good copy of the firmware from the manufacturer’s website and store it on a USB thumb drive. Once you’ve done that, connect the USB stick to the relevant port and press the BIOS Flashback button to initiate the update process.
Conclusion
Updating the UEFI/BIOS on your motherboard is never a daunting task if you figure out the most efficient way to perform such an operation. I hope that this article has been helpful in guiding you through the entire procedure.
Leave a comment down below if you encounter any issues during the update process. Our team will be happy to help you out!