
Windows 10 (and 11) is the most popular Operating System in the world. Over the years, Windows has seen the maximum market share, followed by macOS and Linux.
Despite being the most popular Operating System, Windows isn’t remotely close to being privacy-friendly or secure.
You are almost always at the risk of having your data compromised by malware or even the telemetry from Microsoft.
This guide will explain, in-depth how to make Windows 10 more privacy-friendly and better for the long run.
Who Should Follow This Guide?
I have been running Linux on all my systems for the last 10 years or so. Windows 10 just wasn’t the Operating System for me.
Every other day, new vulnerabilities were exposed. Microsoft kept locking down harder on making telemetry mandatory. And for a student, Windows, and Office licenses were not cheap!
This kind of changed when I got a Gaming PC.
Linux could run all my games from my Steam Library using Proton and DXVK but games with anti-cheat software were a no-go for Linux because Linux doesn’t allow a 3rd party app to compromise the security of the system.
As a result, I couldn’t play games like Valorant, COD, and Apex Legends (and none of my friends wanted to play good ol’ CS: GO with me).
So, I did the reasonable thing. I set up a dual boot system on my computer. I have a 512GB SSD and a 1 TB HDD.
The HDD was reserved for my personal files and games. The 512GB on the SSD though, was split as 80G for Windows 10 and about 375G for my Arch Linux installation.
I only booted up Windows when I needed to game. I am fine with this setup even now. I even added macOS to the mix by using the OpenCore bootloader.
But for the majority of people, it can be a hassle to switch Operating Systems for different needs.
For non-enthusiasts, full-time gamers, and people who use software strictly available on Windows, dual boot isn’t an option.
That said, privacy is a basic right and nobody should be in the dark about their own data.
This guide aims to fix Microsoft’s Operating System to make it privacy-friendly, faster, and more secure.
Hardening Windows 10
This guide has been broken into 4 parts.
- Windows settings
- Hidden Windows settings
- Open-Source 3rd party Tools
- Software alternatives
We recommend doing this on a fresh installation of Windows 10 to reduce bugs and issues.
Also, make sure you have the latest updates installed and set up.
We also don’t recommend signing into a Microsoft account and instead set up your profile as a Local User.
Windows Settings
Windows offers a lot of in-built options to reduce the chances of privacy breaches and reduce the risks of data compromisation.
Most of these settings are available in the Windows Settings app. We will go over each section and know how to make them secure.
System
Under the System tab, the first thing to do is to turn off Notifications and Suggestions from Windows. You will find this option in the Notifications & Actions section of the app.
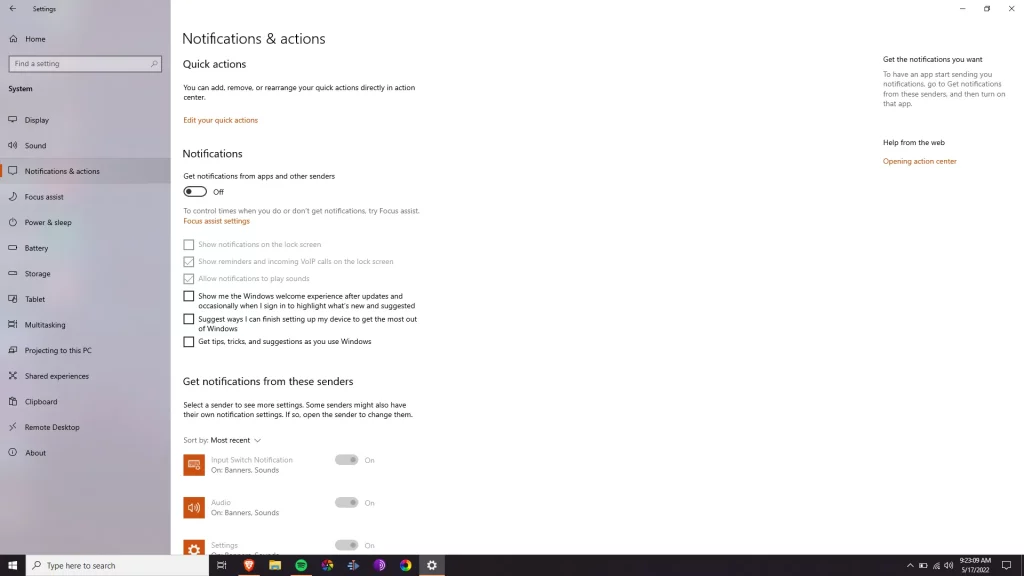
These suggestions are often based on your usage and telemetry. Disabling these will also help with performance as noted by many users.
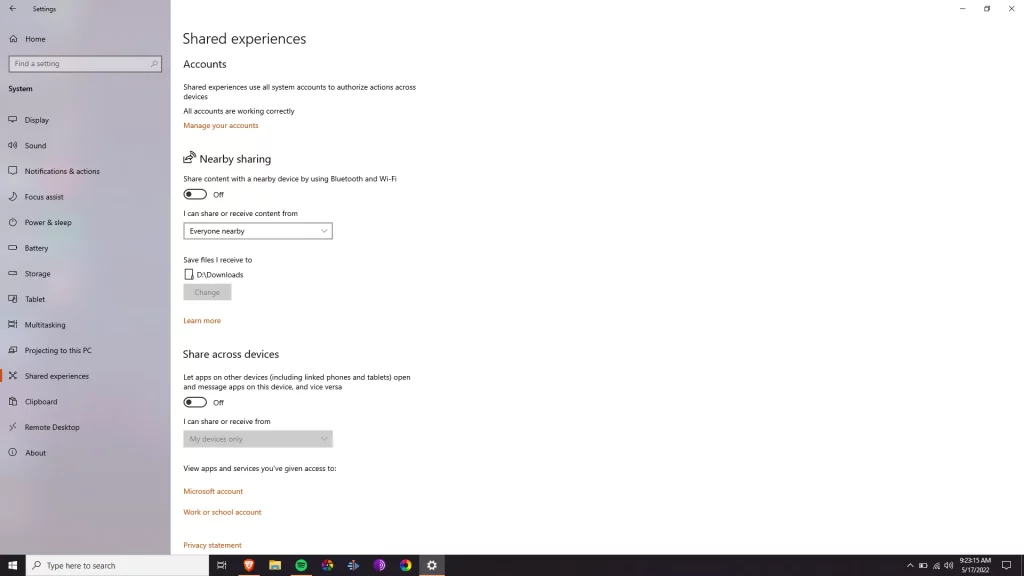
Next up, we have to disable Nearby Sharing and Share across devices under Shared Experiences tab.
Devices
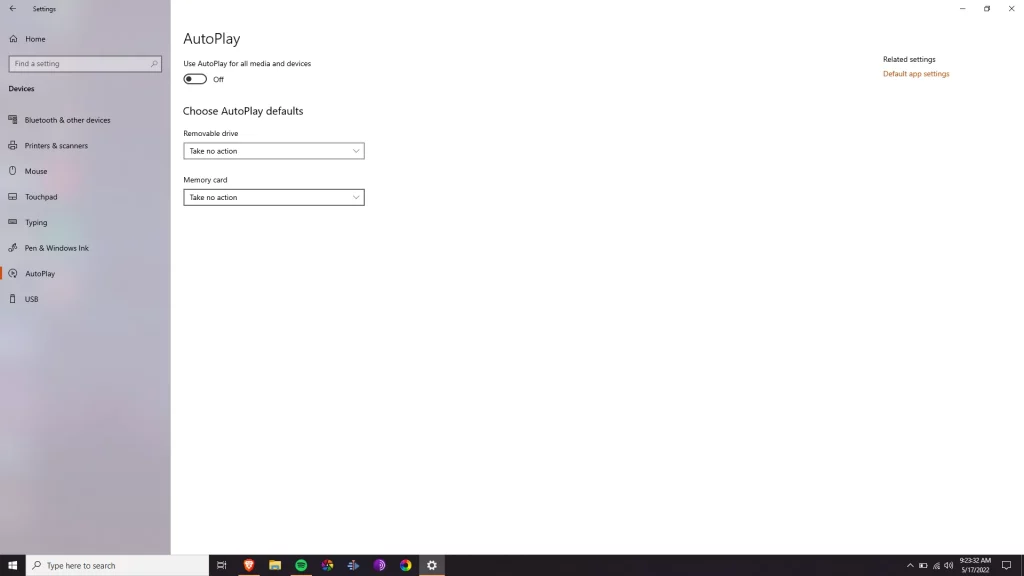
We recommend keeping radios like Wi-Fi and Bluetooth off when not using them. Along with increased battery usage, they are also easily exploitable if not on a secure channel.
Under Autoplay, disable Use Autoplay for all media and devices. Auto-run scripts on USB drives can attack your system if autoplay is enabled.
Apps
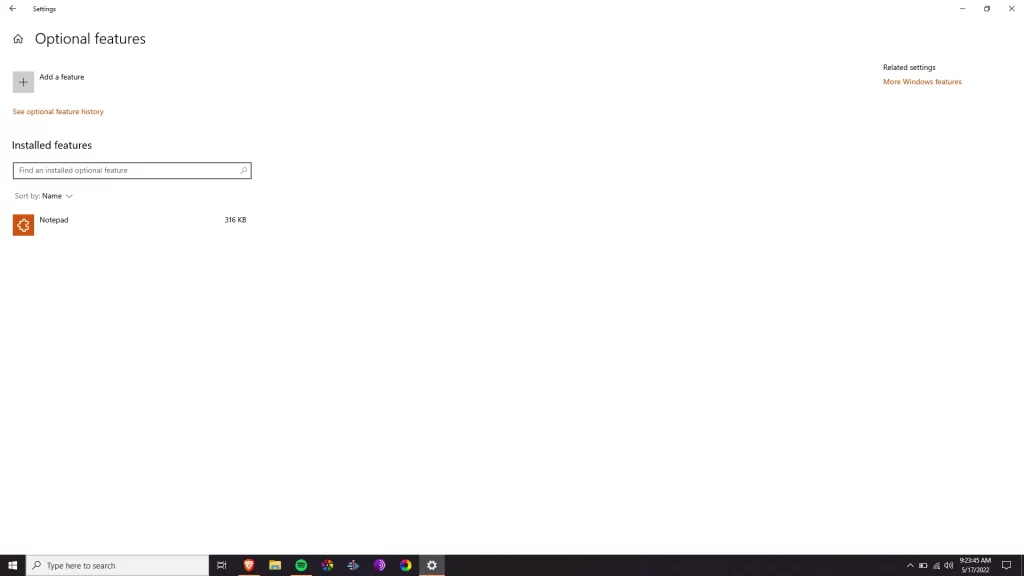
This is one of the most important sections of the Settings menu. Here, under Apps and Features, click on Optional Features and remove all the Installed features which you don’t use. For me, I only need Notepad so I removed all of the entries from this menu.
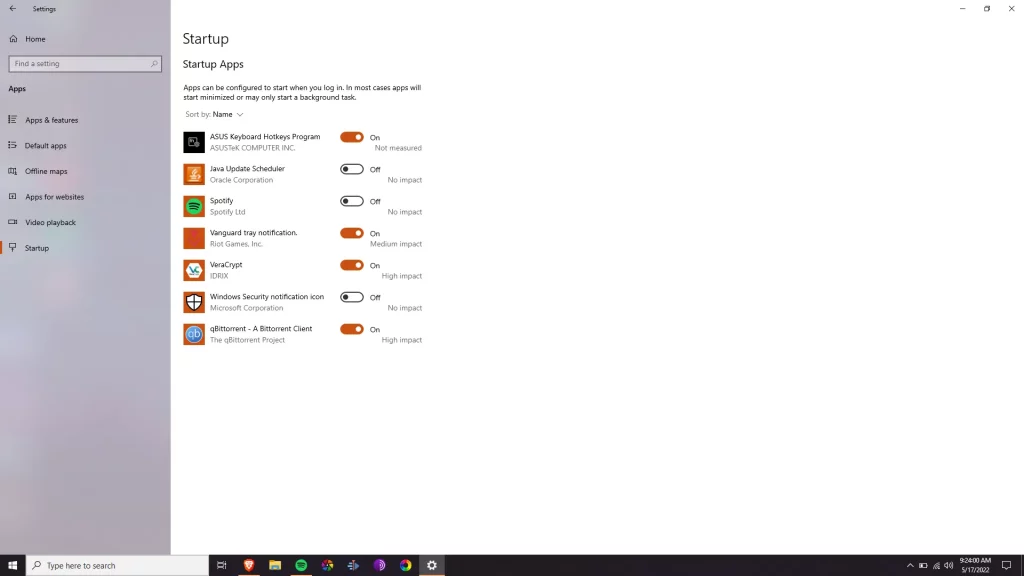
Under Startup on the left pane, disable auto-start for all the programs you don’t want running when you turn on your system.
Accounts
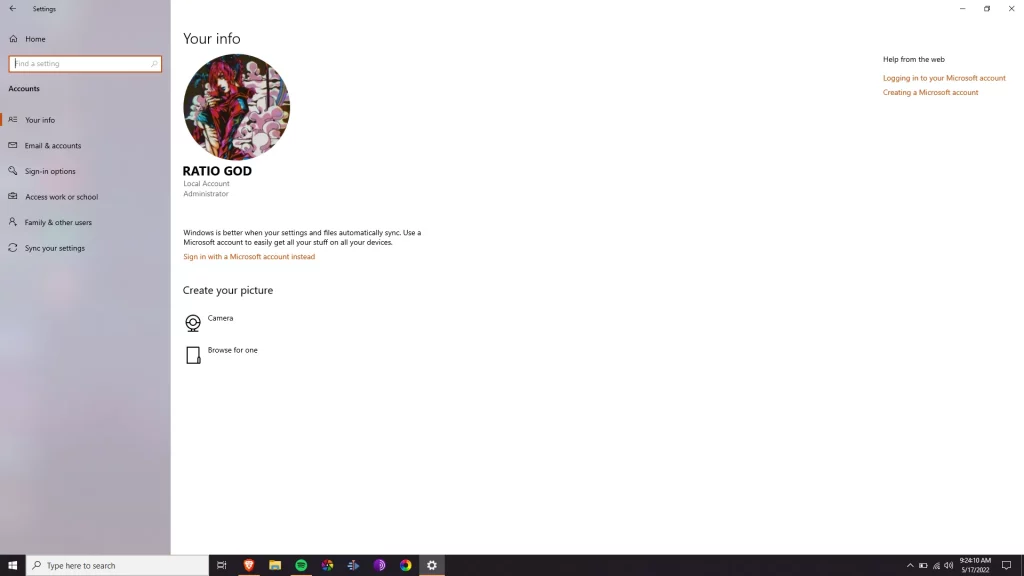
Under the Accounts menu, make sure you’re logged in with a Local Account.
Make sure you don’t have any of your email accounts logged into the system under Email and accounts.
Also, use a strong password for unlocking your device.
Gaming
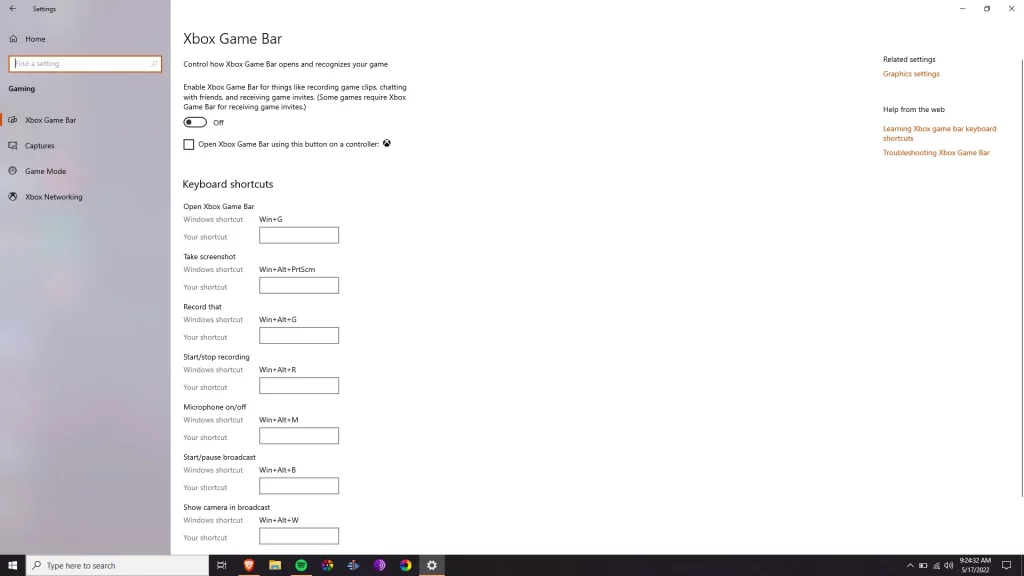
Although the gaming tools in Windows 10 are pretty cool, I have noticed better FPS in games with these options disabled.
Game Bar and Game Mode should be disabled.

Privacy
The most important part of the Settings app. Here you can allow/disallow all of your apps from accessing certain hardware/software. You can also disable some telemetry under here.
Windows Permissions
Under the General menu, turn off all the entries. Having them enabled means Microsoft has access to all your app usage and your private data. Disabling this entire menu will increase your privacy significantly.

The same goes for Speech Recognition and Typing personalization as well. You shouldn’t let your OS act as a keylogger for your computer.
Diagnostics and Feedback is a tricky part and it won’t let you turn off telemetry completely, but we use 3rd party tools later for this anyway. For now, turn off all the entries you see and set Diagnostic data to Required. You can also choose to delete diagnostic data collected on your device.
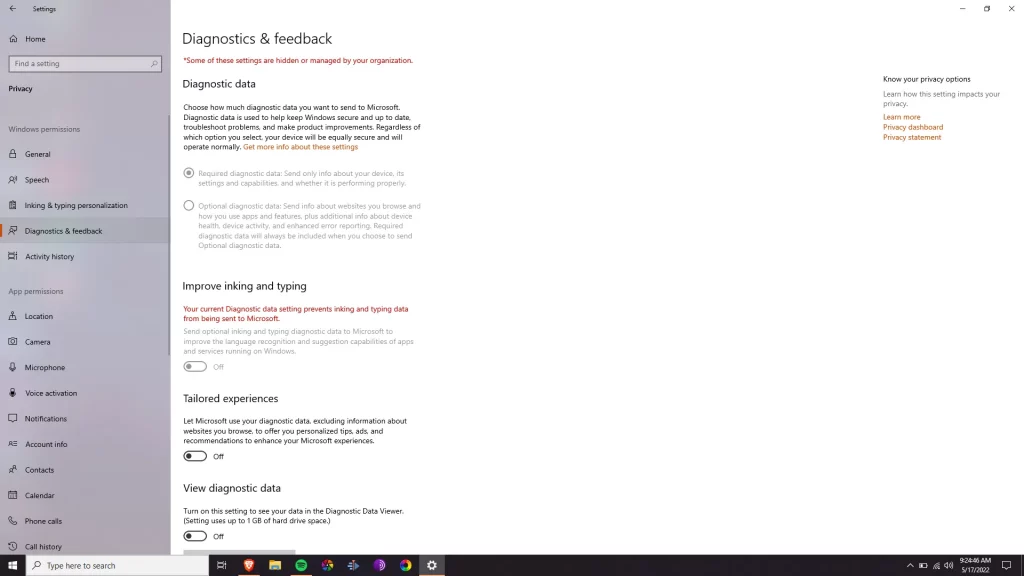
Activity History is similar. We recommend disabling everything here.
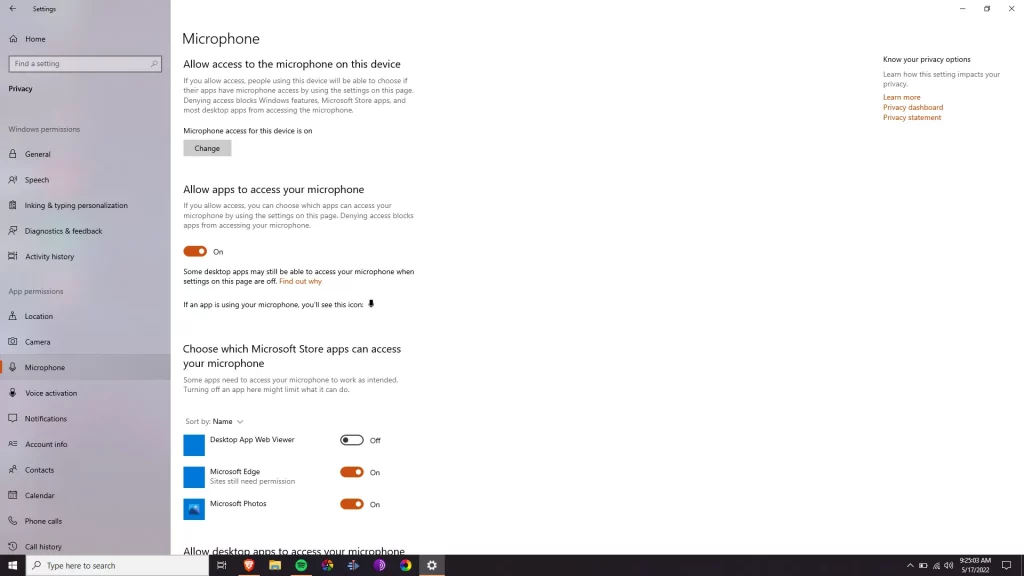
App Permissions
Under this section, we recommend going over all the entries on the left and disabling/ enabling them according to your usage.
I have my camera and all other options disabled because I don’t use them ever. On the other hand, I keep the microphone enabled for Multiplayer games.

Hidden Windows Settings
Have you ever been stuck on a Windows update screen for an hour and not able to use your computer?
Now we will use some hidden Windows tools to enhance Windows updates and set it to download Security updates only. This will keep your computer secure and safe, without hindering your usage in any way. Security updates install quite fast.
Step 1: Press Win+R on your keyboard.
Step 2: Type Regedit and hit enter.
Step 3: Allow Admin privilege to the app and proceed.
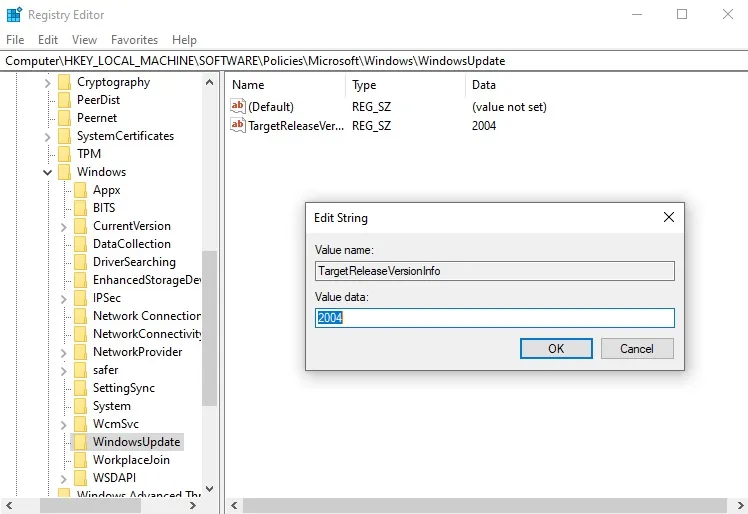
Step 4: Navigate to HKEY_LOCAL_MACHINE\SOFTWARE\Policies\Microsoft\Windows
Step 5: Right-click on the Windows folder you opened and click on Key under New.
Step 6: Enter WindowsUpdate as the new directory’s name.
Step 7: Right-click on Windows Update and select New > DWORD (32bit) Value.
Step 8: Enter TargetReleaseVersion as the name and set its value to 1.
Step 9: Now right-click on Windows Update again and select New > String Value.
Step 10: Name the new string value TargetReleaseVersionInfo and set the Windows 10 version number that you want to keep as the value.
For example, if you are using Windows 10 20h2 and want to keep this version and not upgrade to Windows 10 21h2, you must set the value to “20h2”.
Step 11: Close Registry Editor and reboot your system.
Open-Source 3rd-Party Tools
We have configured Windows 10 on its own quite well. To seal the deal, we will now use some open-source tools to encrypt your storage, completely disable data collection and remove a lot of bloatware from your system.
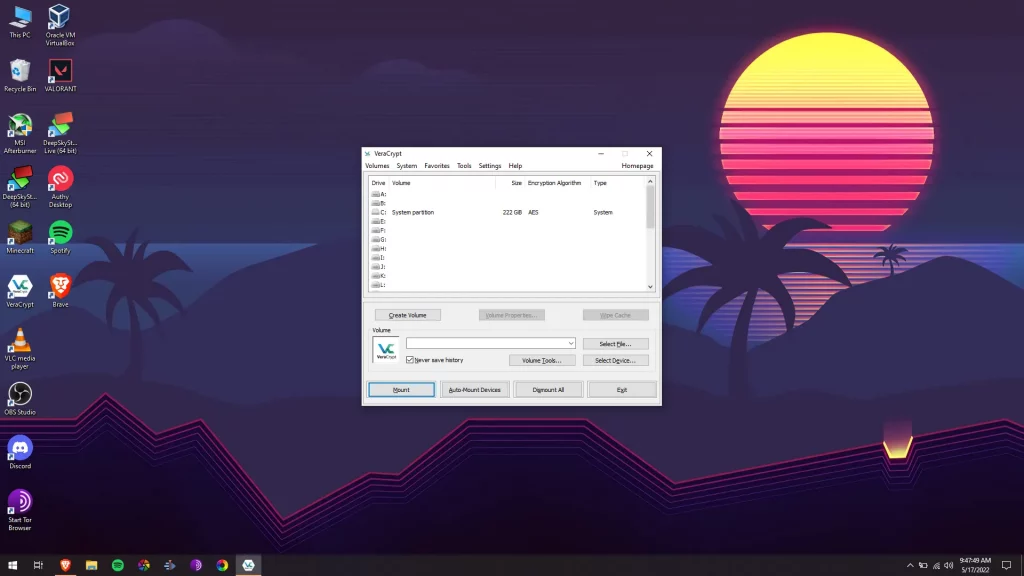
VeraCrypt
VeraCrypt is an open-source disk encryption tool for Windows/macOS/Linux.
For laptops, disk encryption is quite important. In case of theft, your data could be compromised and you could lose access to some valuable information. Hence, encryption is necessary.
If you’re running Windows Pro or Enterprise, you have BitLocker available. But it’s proprietary and we prefer Open-Source ways. Bitlocker is also unavailable on Windows 10 Home, which most users run.
Setting up VeraCrypt is quite easy.
Step 1: Head to the VeraCrypt download page and download the latest Windows release.
Step 2: Click on the setup file and follow the prompts to install the program.
Step 3: Click on the System button in the menu at the top.
Step 4: Click on Encrypt System Partition/Drive.
Step 5: Follow the setup and select a strong password.
Make sure to use AES Encryption Algorithm when prompted to choose.
Step 6: Your computer will reboot. Enter the passcode you selected when prompted.
Now your system partition is completely encrypted and secure from malicious access.
O&O ShutUp 10++
With O & O ShutUp10 ++, you have full control over the features you use in Windows 10 and Windows 11 and can decide for yourself when your data is over-accessed.
Choose how Windows 10 and Windows 11 respect your privacy by deciding which features you want to disable through a very simple interface.
Step 1: Download O&O ShutUp 10++ .
Step 2: Launch the executable you just downloaded.
Step 3: Under Actions, select Recommended and somewhat recommended.
Step 4: Wait for the app to process and exit.
Step 5: Reboot your PC.
You will see a lot of options on your system settings that will be greyed out including Diagnostics and Feedback.
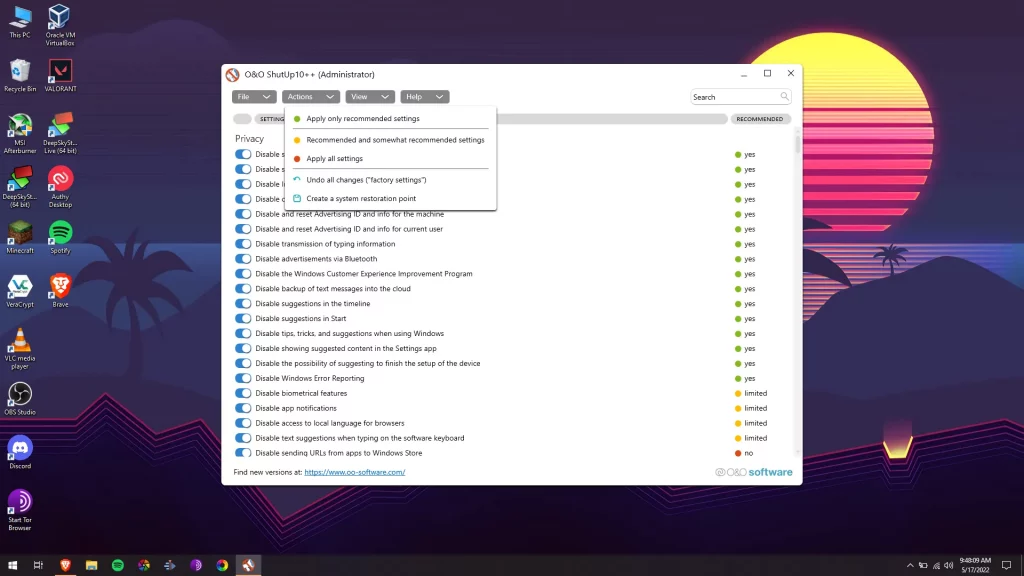
This means those options are disabled on a system level and telemetry is completely off now.
Farag2’s Sophia Script
Sophia Script for Windows is the largest PowerShell module on GitHub for Windows 10 and Windows 11, tweaking and automating common tasks.
- Set up Privacy & Telemetry;
- Turn off diagnostics tracking scheduled tasks with pop-up form written in WPF;
- Set up UI & Personalization;
- Uninstall OneDrive “correctly”;
- Interactive prompts;
- The TAB completion for functions and their arguments (if using the Functions.ps1 file);
- Change %TEMP% environment variable path to %SystemDrive%\Temp
- Change location of the user folders programmatically (without moving user files) within interactive menu using arrows to select a drive
- “Desktop”;
- “Documents”;
- “Downloads”;
- “Music”;
- “Pictures”
- “Videos.
- Uninstall UWP apps displaying packages names;
- Generate installed UWP apps list dynamically
- Restore the default uninstalled UWP apps for current user displaying localized packages names;
- The TAB autocompletion for function and its’ arguments by typing first letters
- Disable Windows features displaying friendly packages names with pop-up form written in WPF;
- Uninstall Windows capabilities displaying friendly packages names with pop-up form written in WPF;
- Download and install the HEVC Video Extensions from Device Manufacturer from Microsoft server using https://store.rg-adguard.net parser to be able to open .heic and .heif formats;
- Register app, calculate hash, and set as default for specific extension without the “How do you want to open this” pop-up using special function;
- Install any supported Linux distrobution for WSL displaying friendly distro names with pop-up form written in WPF;
- Create a
Windows CleanupandWindows Cleanup Notificationscheduled tasks for Windows cleaning up unused files and updates;- A native toast notification will be displayed where you can choose to snooze, run the cleanup task or dismiss
- Create tasks in the Task Scheduler to clear
%SystemRoot%\SoftwareDistribution\Download%TEMP%
- Pin shortcuts to Start via pure PowerShell
- Three shortcuts are pre-configured to be pinned: Control Panel, “old style” Devices and Printers, and Windows PowerShell
- Unpin all Start menu tiles;
- Turn on Controlled folder access and add protected folders using dialog menu;
- Add exclusion folder from Microsoft Defender Antivirus scanning using dialog menu;
- Add exclusion file from Microsoft Defender Antivirus scanning using dialog menu;
- Refresh desktop icons, environment variables and taskbar without restarting File Explorer;
- Configure the Windows security;
- Many more File Explorer and context menu “deep” tweaks.
These are the quoted features of Sophia script from its GitHub page.
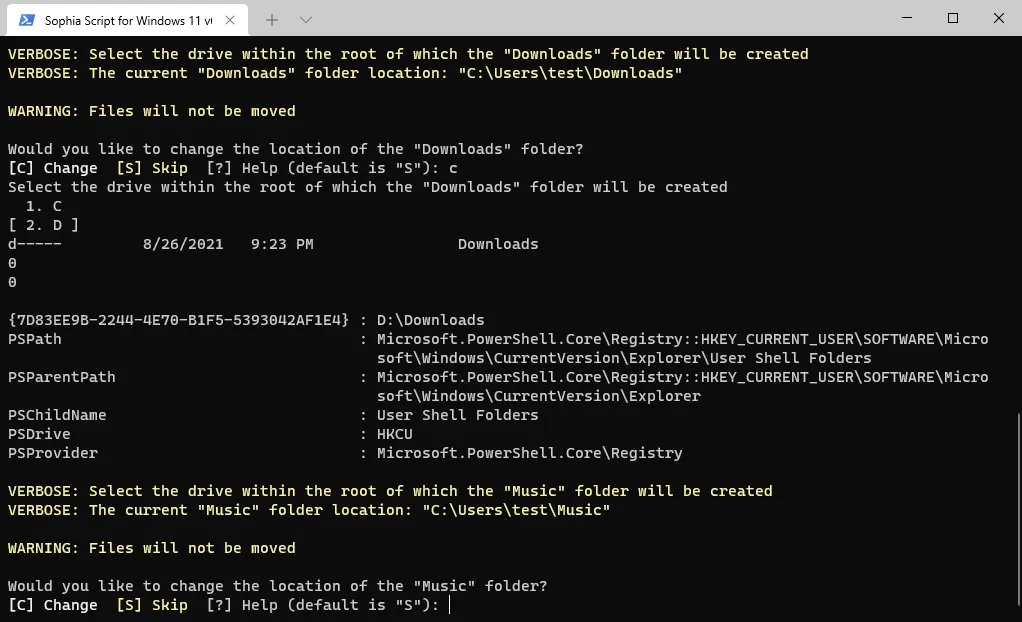
Setting it up is quite easy. We recommend going through the script on your own and modifying it according to your needs before you run it.
Step 1: Choose the right script version for your Windows.
Step 2: Download the latest release and extract it with a file manager.
Step 3: Open the file Sophia.ps1 in a text editor to configure the functions you want to perform.
Put “#” before the function if you don’t want it to be executed and remove the “#” before the function if you want it to be executed.
Step 4: Press Win+X and select Windows Powershell (Admin).
Step 5: Type in the following to set the path to your script.
Set-Location -Path "Path\To\Sophia\Folder"
Step 6: Set execution policy to allow running scripts by typing in:
Set-ExecutionPolicy -ExecutionPolicy Bypass -Scope Process -Force
Step 7: Run .\Sophia.ps1 and hit enter
Step 8: Follow the prompts and dialogs to remove all bloatware from your computer.
Software Alternatives
Apart from Windows itself, a lot of proprietary apps also use your data for targeting ads and understanding your usage.
These apps sometimes are quite important and finding a good alternative could be quite a challenge.
You can read our article covering FOSS Software alternatives for Paid apps.
But apart from that, there are ways you can reduce app consumption further.
Web Browser
Use a privacy-oriented web browser such as Firefox or Brave. Make sure you remove all bindings for file types for Microsoft Edge.
Brave is a great alternative to Google Chrome. It’s based on the OSS Chromium engine and adds tracker protection, and Adblock among other privacy-oriented features.
Media Player
For offline media files, VLC is undoubtedly the FOSS king. It supports almost all extensions for audio/video files and adds a myriad of options for users to play with.
As for online services such as Netflix, Spotify, and Amazon Prime, you can use them in your web browser. They provide the same functionality without staying on your system 24×7.
Office Suite
Another product of Microsoft- Office 365 is quite important for productive people. However, it collects telemetry and is quite expensive.
Google Office Suite is available in your web browser and provides functions similar to Word, Excel, and Powerpoint along with 15GB of free Google Drive storage.
LibreOffice is a standalone office suite that works much like MS Office but is FOSS and doesn’t collect data.
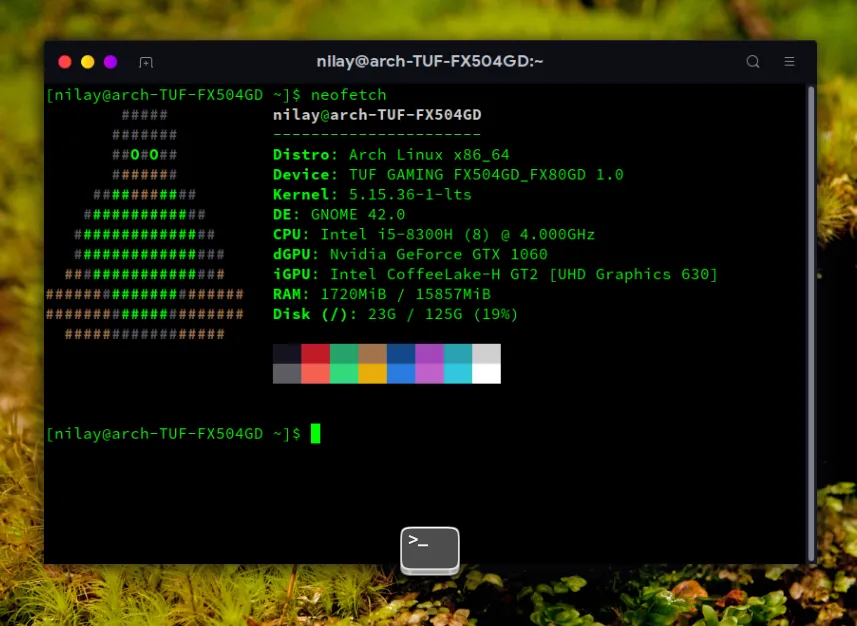
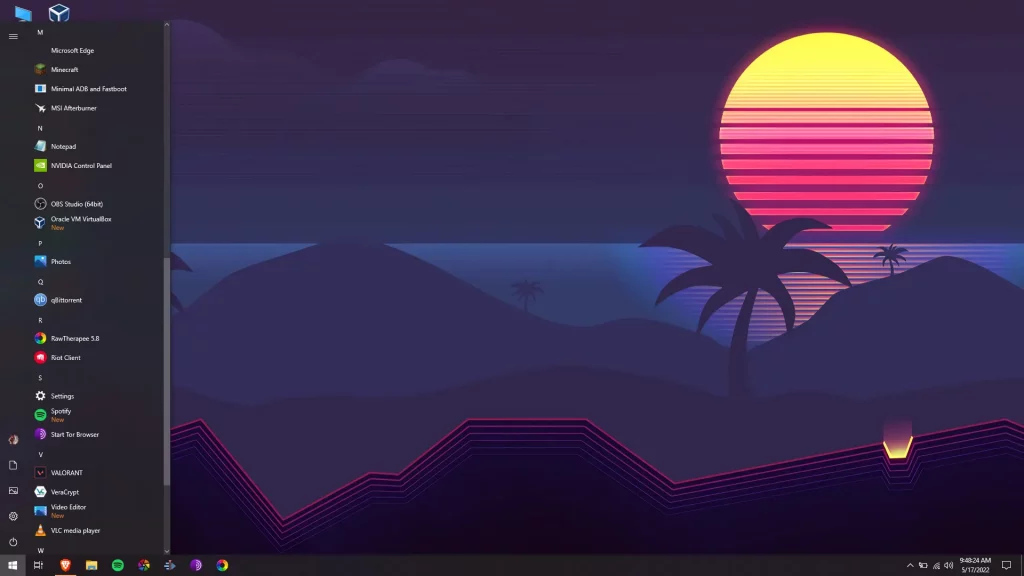
As you can see below, even in my Windows 10 installation, all my apps are replaced with FOSS alternatives

Wrapping Up
This was an extensive guide on privacy and security for Windows.
After following all the steps, you will notice fewer intrusions, better performance and battery (on mobile devices), and improved gaming performance.
If you follow the proper internet safety etiquette like not downloading files from websites you don’t trust, not running random executables unless they’re trusted, or having their source code open for viewing, you will be safe from any cases of malware or viruses.
A simple option would be to run Linux. I have to say it, folks! Everything we did to Windows 10 to make it secure, is already done and ready for us the moment we boot up a Linux distro.
But we get that you need Windows 10 and now you can use it without any big corporation or scammers spying on you!
Hope you found this article enjoyable and informative. Feel free to drop your queries and suggestions in the comments box below!